Assassin's Creed Black Flag Resynced: Salvage Crate Locations & Interactive Tracking Guide
Salvage Crates in Assassin's Creed Black Flag Resynced are the distinctive blue containers scattered across Caribbean settlements — split into two sub-types: Salvage Crates containing trade goods (Wine, Spice, Sugar, Rum Barrels) sold to Harbourmasters for Reales, and Salvage Chests containing direct Reales from 150 to 245 per container.
Together, they represent the fastest land-based income source in early settlements.
All Salvage Crate locations are included on our Assassin's Creed Black Flag Resynced 100% completion maps.
Salvage Crates vs Salvage Chests vs Standard Chests
Three distinct container types exist in Resynced, each tracked separately:
- Standard Chests (brown wooden) — tracked in the Chest guide. Give Reales directly. Most common land container type across all 79 tracked chests.
- Salvage Crates (large blue containers) — tracked here. Give trade goods: Wine, Spice, Sugar, and Rum Barrels. Trade goods are sold at any Harbourmaster via the Cargo Trading menu — different settlements offer different prices, so checking the highest-paying port before selling is worth the brief detour.
- Salvage Chests (small blue chests) — also tracked here. Give direct Reales (150–245 per chest) without requiring a Harbourmaster visit.
Havana: The Most Salvage-Dense Location
Havana holds the most Salvage entries of any mapped location — including a major cluster inside and around Castillo de la Real Fuerza, the fort at the heart of the "...And My Sugar?" quest.
The Castillo alone contains over eight Salvage Crates and Chests across its upper walls, lower courtyard, and dock exterior, requiring careful guard management:
- The lower courtyard has two guards and two containers — a Salvage Chest in the center and a Salvage Crate against the right wall. Use the hay cart at the base of the stairs for cover, wait for the first guard's patrol, take him silently, then repeat for the second. Both containers are immediately accessible once the area is clear.
- One of the Castillo's lower rooms also features a resident parrot — interact with it before looting the Salvage Chest tucked against the back wall.
- The most challenging Havana Salvage entry sits in a heavily guarded courtyard requiring clearing three rooftop sentries and five ground-level guards — approach via the "Frederico-Ancla Canyao" sign building, take sentries from the roof before dropping to the pergola, and use the bushes to stalk remaining guards.
Nassau: Rum and Wine
Nassau concentrates six Salvage Crates with predominantly Rum Barrels (6–7 per crate) and Wine alongside two direct-Reales containers (160 and 187 Reales).
Sugar crates are also found here in smaller quantities. All six Nassau Salvage Crates become accessible on first arrival during "Now Hiring."
Cape Bonavista: Early Access
Cape Bonavista holds six Salvage Crates accessible during or shortly after Sequence 1.
Two crates specifically unlock during the "Free the Merchant" objective of the "Edward Kenway" quest — one northwest of the beach enemies near wooden boat scraps, and one along the right perimeter leading to the ocean by a leaning palm tree. Both can be looted without disrupting the quest objective.
| Name | Map Location | Details | Screenshot | Found |
|---|---|---|---|---|
| Salvage CrateCumberland Bay | Cumberland Bay | Found on the northeastern side of the island, near a small enemy camp during the quest "Loyalty, Discipline, and Courage." Rewards:
| ||
| Salvage ChestPrincipe | Principe | Located up inside a watch tower on the northwestern side of the Portuguese Camp. Easy to access from Infiltration Point #3. Chest Coordinates: 102, 19. Rewards:
| ||
| Salvage ChestPrincipe | Principe | Can be located inside a small cave at the end of the trail that heads southeast. Chest Coordinates: 107, 14. Rewards:
| ||
| Salvage CratePrincipe | Principe | Located in the center of a small campsite within the larger Portuguese Camp, near the “Burgess’ Note” quest item. Crate Coordinates: 104, 18. Rewards:
| ||
| Salvage ChestPrincipe | Principe | This chest is located along the northern perimeter of the large Portuguese Camp, on the rocky cliffs below a guard tower.
Chest Coordinates: 106, 21. Rewards:
| ||
| Salvage CrateCumberland Bay | Cumberland Bay | Found in the small camp in the center of the island. You can perform a leap of faith from the Viewpoint in the area, and from where you land, the camp is straight ahead. The chest will be up against some empty crate near a tent. Rewards:
| ||
| Salvage ChestPrincipe | Principe | This chest is located on the northwestern side of the large Portuguese Camp, near the coastline. Look for a small campsite with a tent, where the chest is guarded by two enemies. Chest Coordinates: 113, 20. Rewards:
| ||
| Salvage CratePrincipe | Principe | This salvage crate is located on the northeastern side of the large Portuguese Camp, along the coastal perimeter. Look for a small campsite with white tents near the shoreline. The crate can be found in the center of this campsite. Crate Coordinates: 116, 18. Rewards:
| ||
| Salvage ChestPrincipe | Principe | This chest is located along the southern perimeter of the large Portuguese Camp. Follow the path leading toward the camp’s southeastern dock and look for a small house along the way. The chest can be found just outside the house. Chest Coordinates: 113, 13. Rewards:
| ||
| Salvage ChestPetite Caverne | Petite Caverne | Located on the left-side dock. Wait for the two guards to finish talking, then sneak up behind them to perform a double assassination. Once they are down, turn around to find this salvage chest resting against the rock wall. Chest Coordinates: 866, 237. Rewards:
| ||
| Salvage ChestPetite Caverne | Petite Caverne | From the cave entrance, head toward the right-hand boardwalks running alongside the cave wall. Take out the fishing guard stationed here—and potentially a wandering Hutia!—then look for the chest tucked securely into the corner against the wall. Chest Coordinates: 866, 239. Rewards:
| ||
| Salvage CratePetite Caverne | Petite Caverne | This salvage crate can be located up on the second level in the western part of the cave, near a small waterfall. Chest Coordinates: 863, 236. Rewards:
| ||
| Salvage ChestFort Cabo de Cruz | Fort Cabo de Cruz | Found on one of the upper levels of the fort in the center. Rewards:
| ||
| Salvage ChestFort Cabo de Cruz | Fort Cabo de Cruz | On the small level just below the war room against the wall near a line of cannons. Rewards:
| ||
| Salvage ChestMatanzas | Matanzas | Make your way to the southernmost part of the Matanzas Plantation's restricted area. From the crocodile pond, head east to the small house on the left. Take out the rooftop lookout and two ground guards, then look for the chest around the backside of the house, near the campfire.
Rewards:
| ||
| Salvage CrateMatanzas | Matanzas | Make your way to the southernmost part of the Matanzas Plantation's restricted area. Starting from the crocodile pond, head east until you reach a small house on the left. Once you clear the rooftop lookout and the two ground guards, head to the front of the house by the waterwheel to find this crate tucked under a covered shelter. Note: Keep an eye out—there's a second salvage chest waiting in the back area of this same house!
Rewards:
| ||
| Salvage ChestCaribbean Sea | Caribbean Sea | This salvage chest can be found inside of a small enemy camp right beside the fire. Look for it in the area with the guard tower. Chest Coordinates: 101, 40 Rewards:
| ||
| Salvage ChestCaribbean Sea | Caribbean Sea | Approach the small unnamed island south of Fort Dry Tortuga from the northeastern shore. Make landfall and scale the broken ladder on the left-hand cliff. Once you reach the top of the ruins, walk straight ahead—taking a moment to grab the other two salvage chests and the nearby Animus Keys—then head up the stairs to your right. You'll find this chest sitting against the back western wall right beside a prisoner's skeleton. Rewards:
Note: Chest coordinates are 238,671. | ||
| Salvage CrateCaribbean Sea | Caribbean Sea | This salvage crate can be found inside of a small enemy camp right beside the fire. Look for it in the area with the guard tower. Chest Coordinates: 101, 40 Rewards:
| ||
| Salvage ChestCaribbean Sea | Caribbean Sea | This salvage chest can be found inside of a small enemy camp right beside the fire. Look for it in the area with the second guard tower. Chest Coordinates: 152, 28 Rewards:
| ||
| Salvage CrateAnotto Bay | Anotto Bay | Emerge from the tunnel and immediately check the dock to your left to claim this salvage crate! It will be on top against the back wall. Rewards:
| ||
| Salvage ChestAnotto Bay | Anotto Bay | The salvage chest can be found on the eastern side of the small docks. Rewards:
| ||
| Salvage ChestAnotto Bay | Anotto Bay | This salvage chest can be found on the southern side of the small docks within the enemy camp. Rewards:
| ||
| Salvage CrateGrand Cayman | Grand Cayman | Start at the small coastal camp on the southern side of the area. Follow the trail just behind it between the large cliff walls until it dead-ends to find this chest. Rewards:
| ||
| Salvage CrateGrand Cayman | Grand Cayman | Start at the boardwalk behind the Grand Cayman Harbourmaster. Face south, head right to the intersection with two sets of stairs, and use Eagle Vision to find this chest hidden beneath the elevated house between them. Chest Coordinates: 362, 299. Rewards:
| ||
| Salvage CrateGrand Cayman | Grand Cayman | Stand in front of the Grand Cayman Tavern facing outward, and make your way left beneath the two covered shelters. Just after the second shelter, hop off the left side down to the ground, then turn around to find a sheet-covered opening beneath the boardwalk that leads to this chest. Chest Coordinates: 361, 300. Rewards:
| ||
| Salvage ChestCaribbean Sea | Caribbean Sea | On the unnamed Island, northeast of Grand Cayman, in the Cruz sector of the Caribbean. Chest Coordinates: 408, 362. Rewards:
| ||
| Salvage CrateCaribbean Sea | Caribbean Sea | On the unnamed Island, northeast of Grand Cayman, in the Cruz sector of the Caribbean. Chest Coordinates: 409, 360. Rewards:
| ||
| Salvage CrateCaribbean Sea | Caribbean Sea | On the unnamed Island, northeast of Grand Cayman, in the Cruz sector of the Caribbean. Crate Coordinates: 411, 361. Rewards:
| ||
| Salvage ChestSan Juan | San Juan | Locate this salvage chest immediately upon exiting the water tunnel. First, eliminate the two nearby workmen guarding the area. Once the area is secure, you will find your chest resting against the wall right next to the tilted cart. Rewards:
| ||
| Salvage CrateSan Juan | San Juan | This salvage crate is located in the southern part of the enemy camp on the lower level, right next to the San Juan Secret: Locked Special Chest. Rewards:
| ||
| Salvage CrateSan Juan | San Juan | This salvage chest is located on the very top level after crawling out of the smugglers' den. There will be 2 enemies here you'll need to dispose of first. Rewards:
| ||
| Salvage CratePinos Isle | Pinos Isle | Located in the northwestern ruins, just outside the restricted zone's perimeter. Find the tower holding the area's viewpoint and search inside on the second level to find this salvage crate. Chest Coordinates: 303, 455. Rewards:
| ||
| Salvage CratePinos Isle | Pinos Isle | You can find this salvage chest in the northwestern ruins, just outside the perimeter of the restricted zone. Chest Coordinates: 303, 454. Rewards:
| ||
| Salvage CratePinos Isle | Pinos Isle | You can find this salvage crate in the northwestern ruins, just outside the perimeter of the restricted zone. Crate Coordinates: 304, 455. Rewards:
| ||
| Salvage CratePinos Isle | Pinos Isle | Look for this salvage crate on the second level of the northern ruins, towards the western side. Crate Coordinates: 306, 455. Rewards:
| ||
| Salvage CratePinos Isle | Pinos Isle | This salvage crate can be found right next to Pinos Isle Chest #1, up in the upper northern ruins against the mountain wall. Rewards:
| ||
| Salvage CratePinos Isle | Pinos Isle | Head up to the ruins in the northeastern section of the area to claim this salvage chest! Once you are near Maya Stela #1, look for the small campsite nearby and search the tents to find the chest inside. Rewards:
| ||
| Salvage CratePinos Isle | Pinos Isle | Located on the northeastern beach inside the cove (note: there is no official dock). Find the large shipwreck, climb the mainmast to the bowsprit, and perform a Leap of Faith into the palm leaves below. Step out and look straight ahead to find the salvage crate resting against the Maya ruins. Crate Coordinates: 314, 453. Rewards:
| ||
| Salvage CratePinos Isle | Pinos Isle | Located on the northeastern beach inside the cove (no official dock). Find the severed bow of the large shipwreck and stand at its broken end facing the Maya ruins. Walk straight ahead through the small stone archway and immediately look left to find the chest resting against a wooden fence. Chest Coordinates: 314, 452. Rewards:
| ||
| Salvage CratePinos Isle | Pinos Isle | This salvage crate can be found in the center of the area, towards the location of the second panther den. Head inside the old ruin building to find the crate up against a wall on the northern side of the structure. Rewards:
| ||
| Salvage CratePinos Isle | Pinos Isle | Located in the central ruins, just south of the northern complex. Head up to the second level to find this salvage crate sitting next to two guards. Crate Coordinates: 307, 452. Rewards:
| ||
| Salvage ChestPinos Isle | Pinos Isle | Located in the central ruins, just south of the northern complex. Head up to the second level to find this salvage chest sitting next to two guards. Crate Coordinates: 307, 452. Rewards:
| ||
| Salvage ChestJiguey | Jiguey | Located near the Jiguey smuggler's hideout cave. Head to the far end of the short eastern beach to find this chest sitting against the wall, right next to a small tent and some stacked crates. Rewards:
| ||
| Salvage ChestJiguey | Jiguey | This salvage chest can be found inside the Smuggler's Hideout in Jiguey Cave. Navigate to the far northwestern side of the large enemy area and climb up to the second level of the wooden rafters. You'll find the chest resting right near the guard armed with a gun. Rewards:
| ||
| Salvage CrateCaribbean Sea | Caribbean Sea | To locate this item, set sail for the small island situated just northwest of Abaco Island and northeast of Florida. You'll find the salvage crate on the northwestern beach, just behind the priest who is giving a sermon of sorts. Rewards:
Note: The Salvage Crate Coordinates are 473,824. | ||
| Salvage CrateCayman Sound | Cayman Sound | Located on the southeastern side of the island behind a boulder near the shore and a skeleton. Rewards:
| ||
| Salvage ChestCayman Sound | Cayman Sound | Up on the cliff beside the note for the Local Event. Rewards:
| ||
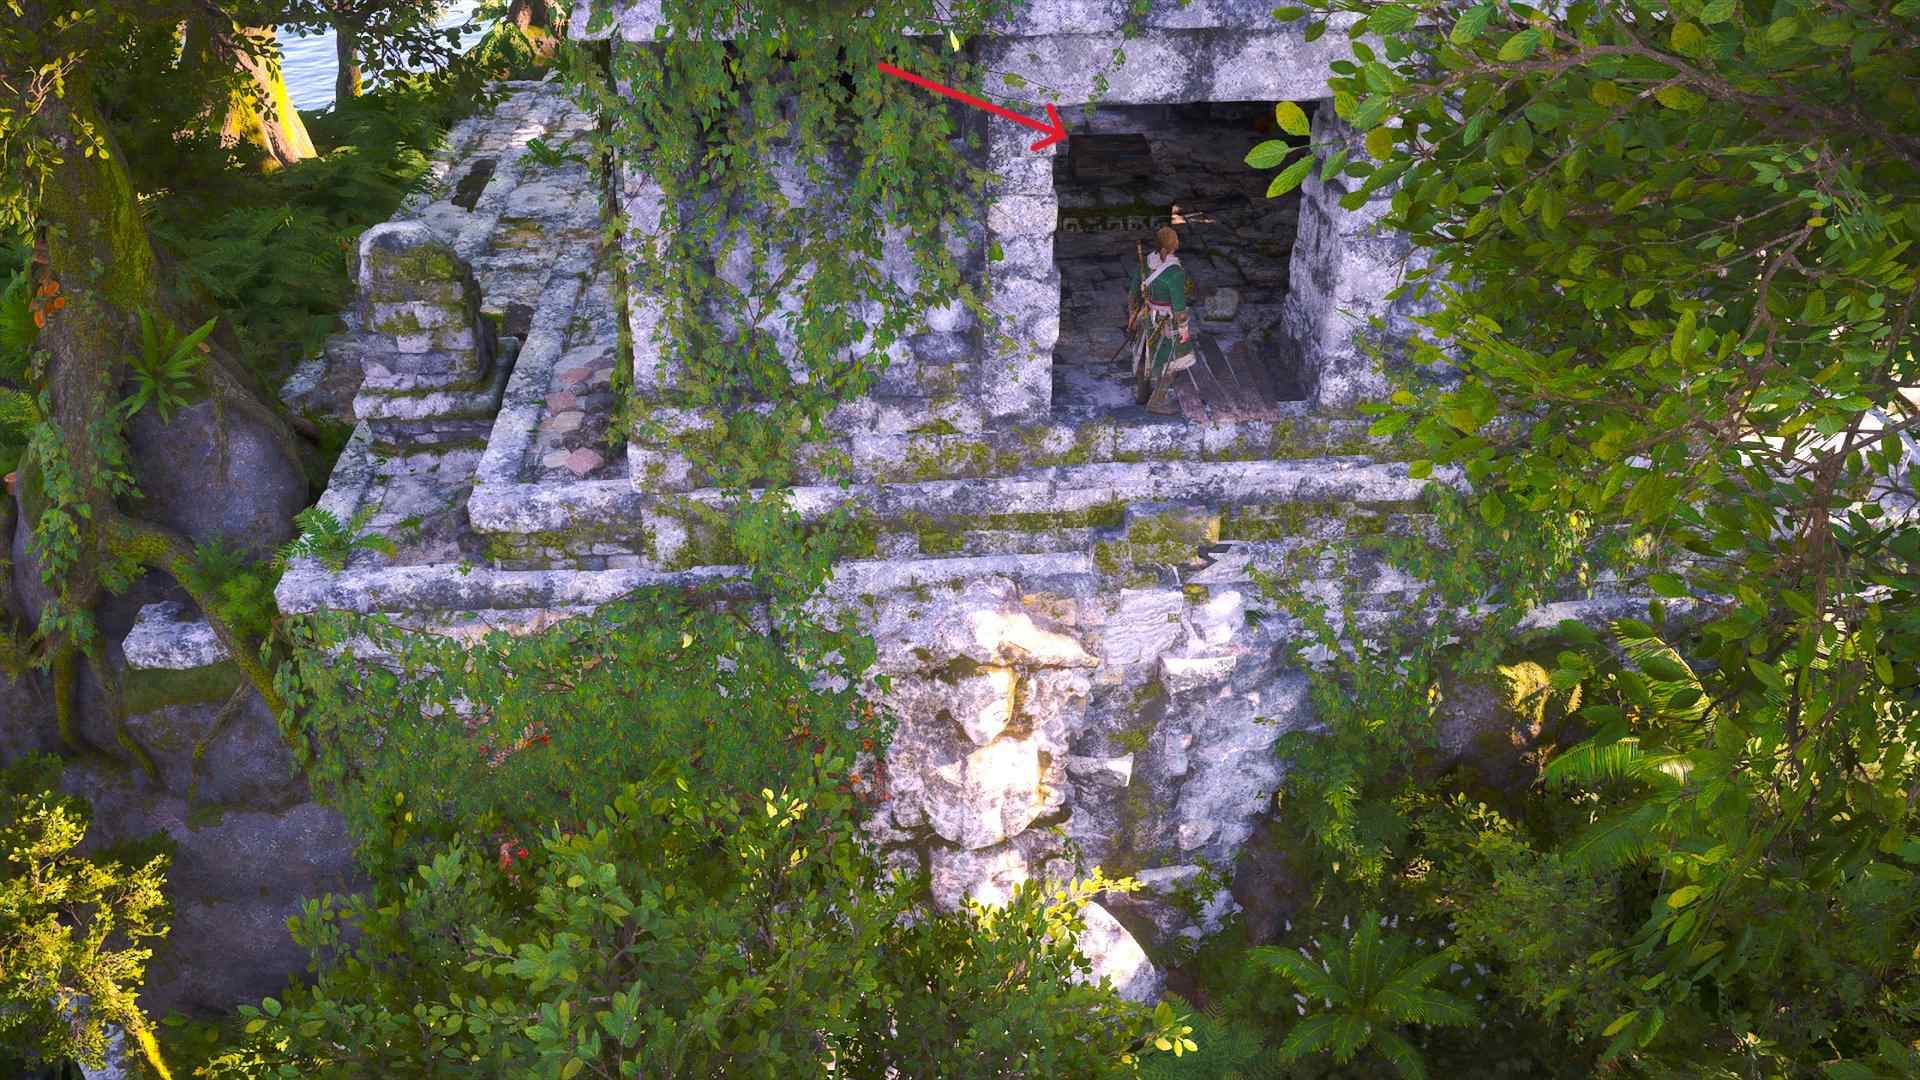
| Salvage ChestSantanillas | Santanillas | Located inside the open structure on top of the mayan ruins on the southeastern side of the island. Rewards:
| ||
| Salvage CrateSantanillas | Santanillas | Located in the center part of the island underneath the archway. Chest Coordinates: 189, 218. Rewards:
| ||
| Salvage CrateFort Charlotte | Fort Charlotte | Located along the second level of the fort in the very front, just east of the line of cannons. Rewards:
| ||
| Salvage CrateFort Charlotte | Fort Charlotte | If you head through the main entrance, this chest will just to the right of the large ramp. Rewards:
| ||
| Salvage ChestFort Chinchorro | Fort Chinchorro | From the War Room, turn left and continue all the way to the southwestern tower. The chest is located there, resting against a wall. Rewards:
| ||
| Salvage ChestFort Chinchorro | Fort Chinchorro | Located on the upper-middle level, against the western wall. Rewards:
| ||
| Salvage ChestFort Chinchorro | Fort Chinchorro | Head to the far western side of the cannon-lined wall at the front of the fort. From there, climb up the wooden debris to reach the chest. Rewards:
| ||
| Salvage CrateTulum | Tulum | Head northwest up the path until you reach a clearing among the ruins. Carefully navigate the heavy redcoat presence and climb the staircase on your left. Near the top, the waterfall will now be on your left; look for the glow of the salvage chest hidden just behind the water. Wait for the coast to clear, then step right through the falling water to claim the glowing salvage chest hidden inside! Rewards:
| ||
| Salvage CrateTulum | Tulum | The salvage chest can be found on the right side of the ruins from the start area during the quest "Overrun and Outnumbered." Chest Coordinates: 33, 388. Rewards:
| ||
| Salvage CrateTulum | Tulum | You'll find this salvage chest inside one of the open ruin buildings off on the left-hand side of the path during the quest "Overrun and Outnumbered." Rewards:
| ||
| Salvage CrateTulum | Tulum | |||
| Salvage ChestCrooked Island | Crooked Island | Located at the southern docks. Step off your ship and walk forward. Right before reaching the dancers and the local offering the Naval Contract, look over the right side of the dock to find this chest sitting in the sand below. Rewards:
| ||
| Salvage ChestCrooked Island | Crooked Island | To find this salvage chest, head to the northwest side of the Crooked Island village area. Look up at the wooden rafters directly underneath the Crooked Island General Store; you will easily spot the chest resting right on an attached shelf. Rewards:
| ||
| Salvage CrateFort Punta Guarico | Fort Punta Guarico | You can find this chest in one of the upper towers where people are gathered for festivities. Rewards:
| ||
| Salvage ChestFort Punta Guarico | Fort Punta Guarico | Located near the upper courtyard on the northwest side of the fort. Approach the large building and look up for a lattice-covered walkway. Climb the front of the building and step inside the walkway to find this chest. Rewards:
| ||
| Salvage ChestFort Punta Guarico | Fort Punta Guarico | From the entrance of the fort, head all the way in until you hit a dead end at a closed door. This chest will be on your right by the door, against the wall. Rewards:
| ||
| Salvage ChestFort Navassa | Fort Navassa | Located in the southwestern part of the fort, behind a wooden rafter. It's tucked away in a corner on a patch of grass by a tree. Chest Coordinates: 699, 192. Rewards:
| ||
| Salvage CrateFort Navassa | Fort Navassa | Located on the roof of the building that lies just south of the nearby fort tower. Chest Coordinates: 699, 196. Rewards:
| ||
| Salvage CrateFort Navassa | Fort Navassa | Climb to the very top of the rectangular tower in the center of the fort's northern side. You will find the chest resting right on top. Chest Coordinates: 701, 196. Rewards:
| ||
| Salvage CrateIle à Vache | Ile à Vache | Found right outside the perimeter of the Tavern area. Rewards:
| ||
| Salvage ChestIle à Vache | Ile à Vache | Found behind the pigeon coop where you accept assassin contracts, in a small wooden shed. Rewards:
| ||
| Salvage CrateIle à Vache | Ile à Vache | Found just a short distance away to the west from the Viewpoint. Rewards:
| ||
| Salvage CrateIle à Vache | Ile à Vache | Sitting out on the beach right beside the rowboat and the nearby camp on the northern side of the island. Rewards:
| ||
| Salvage CrateLong Bay | Long Bay | Located along the shoreline of the western cove, right beside the local event. Rewards:
| ||
| Salvage CrateCaribbean Sea | Caribbean Sea | You can locate this salvage crate on the southern side of the unnamed island that lies just southeast of Fort Navassa. Look for it down by the fishing docks. Crate Coordinates: 770, 166. Rewards:
| ||
| Salvage CrateCaribbean Sea | Caribbean Sea | You can locate this salvage crate on this unnamed island that lies just southeast of Fort Navassa. It'll be right up the hill under a covered shelter. Crate Coordinates: 768, 168. Rewards:
| ||
| Salvage CrateLong Bay | Long Bay | Located on the northern side of the beach, near an area where you can spot a Hutia roaming around. Rewards:
| ||
| Salvage ChestLong Bay | Long Bay | This salvage chest can be found within the same area with the second Jaguar of the area. | ||
| Salvage ChestLong Bay | Long Bay | Found on the upper level, behind a waterfall, right beside a skeleton. Chest Coordinates: 503, 223. Rewards:
| ||
| Salvage CrateKingston | Kingston | Drop down into the riverbed. The salvage chest is tucked inside a rocky alcove along the wall. Rewards:
| ||
| Salvage CrateKingston | Kingston | After locating the first-floor window on the left side of the front rooms and looting the trinket and portrait inside, head back out the window and look up. Climb into the window directly above you to reach the next level. Be cautious of the two guards inside; once the area is clear, you can find this chest sitting on a bench in between two stone busts. Rewards:
| ||
| Salvage CrateCaribbean Sea | Caribbean Sea | You can find this located inside a small camp in the center of the largest island, which is part of the small island cluster just southwest of Ile à Vache. Crate Coordinates: 740, 73. Rewards:
| ||
| Salvage ChestCaribbean Sea | Caribbean Sea | Located on top of one of the sunken ruins that lies between the two small islands southwest of Ile à Vache. Chest Coordinates: 741, 75. Rewards:
| ||
| Salvage CrateCaribbean Sea | Caribbean Sea | Located on the smaller of the two islands (the northern one) that lies southwest of Ile à Vache. Chest Coordinates: 739, 77. Rewards:
| ||
| Salvage CrateCaribbean Sea | Caribbean Sea | Located inside of a small wooden shed near the beach on the northeastern side of the unnamed island, south of Kingston. Crate Coordinates: 624, 49. Rewards:
| ||
| Salvage CrateCaribbean Sea | Caribbean Sea | Located on the northeastern side of the small island that lies south of Kingston. From the northern beach, head up the hill going south to find the old pirate camp. The crate will be here against a rock wall. Crate Coordinates: 624, 48. Rewards:
| ||
| Salvage ChestCaribbean Sea | Caribbean Sea | Located on the northeastern side of the small island that lies south of Kingston. From the northern beach, head up the hill going south to find the old pirate camp. Head through the camp and up to the small boardwalk facing north. You'll find the chest resting here. Crate Coordinates: 625, 48. Rewards:
| ||
| Salvage ChestPort Royal | Port Royal | This salvage chest can be located behind the harbormaster, in a small fenced-in area.
Rewards
| ||
| Salvage ChestFort Serranilla | Fort Serranilla | As soon as you leave the war room after successfully claiming the fort, head to your left to find the chest tucked into a corner. Rewards:
| ||
| Salvage CrateFort Serranilla | Fort Serranilla | Look for this salvage chest down near the northeastern defense wall, on top of a wooden platform that leads to the upper level. Rewards:
| ||
| Salvage ChestFort Serranilla | Fort Serranilla | This chest can be found by heading through the fort's main opening from the dock, then veering right up the hill. At the top, stop and look to your immediate left to spot the chest sitting against the wall. Rewards:
| ||
| Salvage ChestIsla Providencia | Isla Providencia | This salvage chest is located in the island's southeastern ruins, at their northernmost point. Look for it atop one of the small stone ledges that protrude from the front of the ruins. Chest Coordinates: 474, 19. Rewards:
| ||
| Salvage ChestGreat Inagua | Great Inagua | This salvage chest is located on the southcentral beach of Great Inagua, right next to the Animus Rift and Secret #3. Rewards:
| ||
| Salvage ChestIsla Providencia | Isla Providencia | This salvage chest is located in the island's southeastern ruins, at their southernmost point. Look for it atop one of the small stone ledges that protrude from the front of the ruins. Chest Coordinates: 477, 17. Rewards:
| ||
| Salvage ChestIsla Providencia | Isla Providencia | This salvage chest is located within the small swamplands that bridge the trail between the northernmost and southernmost ruins. A Crocodile patrols this area, so consider navigating the overhead tree limbs to safely eliminate the predator from above first. Once the area is clear, you will find the chest resting on a small patch of land among the swampy water below. Chest Coordinates: 473, 22. Rewards:
| ||
| Salvage ChestIsla Providencia | Isla Providencia | This salvage chest is located in the northermost ruins on Isla Providencia, on the far western side. It will be right above the area with the patrolling Black Jaguar, on a stone ledge. Chest Coordinates: 477, 33. Rewards:
| ||
| Salvage CrateNew Bone | New Bone | Located on a bench up against the windmill that hosts the Viewpoint. Rewards:
| ||
| Salvage CrateNew Bone | New Bone | Located towards the center of the New Bone Plantation, right beside a covered shelter and the guard tower. Rewards:
| ||
| Salvage CrateNew Bone | New Bone | Located inside the training area of the courtyard right outside the main manor house. Rewards:
| ||
| Salvage CrateNew Bone | New Bone | Found sitting up against the eastern wall of the warehouse. Rewards:
| ||
| Salvage CrateNew Bone | New Bone | Found right behind the warehouse, in the small courtyard with the alarm bell. Rewards:
| ||
| Salvage ChestMisteriosa | Misteriosa | Located in the Mayan ruin structure towards the back of the area on the north side. Head through the open doorway to find it up against a wall. Rewards:
| ||
| Salvage ChestMisteriosa | Misteriosa | Climb the fountain in the very back of the upper ruins on the northernmost side to reach this salvage chest. Chest Coordinates: 271, 179. Rewards:
| ||
| Salvage ChestMisteriosa | Misteriosa | Located on the first level with the stairs after climbing up. Look for it on the southern side of the ledge. Rewards:
| ||
| Salvage ChestMisteriosa | Misteriosa | Found down by the shoreline right next to two guards. Rewards:
| ||
| Salvage CrateMisteriosa | Misteriosa | Found down by the shoreline right next to two guards. Rewards:
| ||
| Salvage CrateMisteriosa | Misteriosa | Located inside one of the Maya ruin open structures on the upper northwest side of the area. Crate Coordinates: 268, 177. Rewards:
| ||
| Salvage CrateMisteriosa | Misteriosa | Found within the camp on the western side of the area, in the upper level of the mayan ruins. Rewards:
| ||
| Salvage ChestMisteriosa | Misteriosa | Located on the roof of a Mayan structure on one of the upper levels of the northwestern ruins. Chest Coordinates: 266, 173. Rewards:
| ||
| Salvage CrateMisteriosa | Misteriosa | After finishing the Mayan Stela, face the puzzle wall and turn to your right! Look out toward the water to spot a small rocky outcrop, then head over to claim the salvage chest sitting right on top. Chest Coordinates: 265, 170. Rewards:
| ||
| Salvage ChestIsla Providencia | Isla Providencia | This salvage chest can be found in one of the backrooms of the area's northeastern ruins. Look for a corridor with a slim hallway and sneak through to reach the room with the chest. Chest Coordinates: 486, 34. Rewards:
| ||
| Salvage CrateCaribbean Sea | Caribbean Sea | |||
| Salvage CrateCaribbean Sea | Caribbean Sea | |||
| Salvage CrateCaribbean Sea | Caribbean Sea | |||
| Salvage CrateCaribbean Sea | Caribbean Sea | |||
| Salvage ChestHavana | Havana | Located at the southernmost point of the Havana Warehouse area. Look for the chest near a skeleton in a hole, leaning against a large tree near the treeline, but be prepared to take out the two guards watching over it before you can loot it.
Rewards:
| ||
| Salvage CrateHavana | Havana | Located in the southern portion of the Havana Warehouse area. The crate sits directly underneath a covered shelter along the perimeter treeline. Rewards:
| ||
| Salvage CrateHavana | Havana | Located in the western section of the Havana Warehouse area. The crate sits inside the covered stone shelter, pushed directly against the interior northern wall. Rewards:
| ||
| Salvage CrateHavana | Havana | Located in the northwestern area of the Havana Warehouse. The crate sits underneath a wooden shelter near the alarm bell. Proceed with caution, as there are numerous enemies concentrated in this immediate area! Rewards:
| ||
| Salvage ChestHavana | Havana | This salvage chest can be found right on th e front porch of the house where the Officer with the key is stationed. Make sure to grab it after you've gotten the key! Rewards:
| ||
| Salvage ChestHavana | Havana | Head down the path directly in front of the windmill and synchronization point to track down this loot! Look for a small covered tent sitting just off the main path, but be ready to dispatch the three guards patrolling the immediate vicinity. Rewards:
| ||
| Salvage ChestHavana | Havana | Located in the northeastern part of the Havana Warehouse area. Found just up the main path, directly north of the warehouse building, underneath a covered shelter. Rewards:
| ||
| Salvage CrateHavana | Havana | Located inside the restricted fort-like area of Castillo San Salvador de la Punta, northwest of the Havana Warehouse. If you used the left-side infiltration point via the southeastern window, creep into the adjacent room to ambush the single guard watching over the crate. Rewards:
| ||
| Salvage ChestHavana | Havana | Located in the eastern corner of the Castillo San Salvador de la Punta restricted area, northwest of the Havana Warehouse. Approach via the eastern outside wall along the small beach. At the midpoint, climb the tilted cart through the right-side open window to ambush the guard and claim the chest. Rewards:
| ||
| Salvage CrateHavana | Havana | Located in the northern corner of the Castillo San Salvador de la Punta restricted area. Use the right-side infiltration point, climb the rafters, and eliminate the sitting guard. Head right to find the crate beside a cannon and one of the fort's stone towers. Rewards:
| ||
| Salvage CrateHavana | Havana | Located in the eastern corner of the Castillo San Salvador de la Punta restricted area, on the top level of the fort. Use the right-side infiltration point, climb the rafters, and eliminate the sitting guard. Head left to find the chest tucked into a corner near several cannons. Rewards:
| ||
| Salvage CrateHavana | Havana | Located on the upper level in the southern corner of the Castillo San Salvador de la Punta restricted area. Use the right-side infiltration point, climb the rafters, and eliminate the guards along your path. The crate sits near a cannon, a haystack, and a stone tower. Rewards:
| ||
| Salvage ChestHavana | Havana | Located on the upper level of the Castillo San Salvador de la Punta restricted area. Use the right-side infiltration point, and after climbing the rafters, take out the guards along your path. The chest rests near some cannons. Rewards:
| ||
| Salvage CrateHavana | Havana | This salvage crate can be located inside the restricted fort-like area of Castillo San Salvador de la Punta, just northwest of Havana Warehouse. It can be found in the lower main courtyard up against the southern wall. Rewards:
| ||
| Salvage CrateHavana | Havana | ocated inside the Castillo San Salvador de la Punta restricted area, northwest of the Havana Warehouse. Found in the northern part of the fort, on the bottom level of the main courtyard, tucked directly into a closed doorway. Rewards:
| ||
| Salvage CrateHavana | Havana | Located inside the Castillo San Salvador de la Punta restricted area, northwest of the Havana Warehouse. Approach via the back northern wall along the beach. At the northernmost point of the wall, climb through the open window to find the crate directly inside. Rewards:
| ||
| Salvage ChestHavana | Havana | This salvage chest can be found in the very center of the small restricted area camp. Rewards:
| ||
| Salvage ChestLong Bay | Long Bay | Located beside a straw hut at the northern end of the beach inside the island's eastern cove. Rewards:
| ||
| Salvage CrateCorozal | Corozal | Right along the beach, just west of the main dock. Rewards:
| ||
| Salvage CrateCorozal | Corozal | Located in the fisherman's stall right next to the tavern. Rewards:
| ||
| Salvage CrateCorozal | Corozal | Found exactly behind the Harbourmaster's Shop. Rewards:
| ||
| Salvage ChestLong Bay | Long Bay | Located on the lower level directly underneath the main entrance, situated inside a smaller, illuminated cave. Chest Coordinates: 504, 255. Rewards:
| ||
| Salvage ChestLong Bay | Long Bay | Upon arriving in the restricted area, cross over to the opposite side on the top level, then turn right and move upward. You will find the chest waiting at the top of the hill. Rewards:
| ||
| Salvage ChestHavana | Havana | Head to the docks just south of Havana Viewpoint #7 to find this chest safely tucked under a covered shelter. You will pass right by this spot, just southeast of your main objective, while searching for Stede Bonnet's missing cargo during the "...And My Sugar?" mission. Rewards:
| ||
| Salvage ChestHavana | Havana | Head south from Havana's northern entrance, past the pig stalls, to locate this salvage chest under a covered shelter inside the restricted area near the half-stone wall. Infiltration Method: Instead of charging the main entrance, you can climb the building on your left and hop across the rooftops running parallel to the zone to bypass the first three guards. Drop down when you spot the stairs and climb onto the yellow tent roof above the southern guard. Wait for the northern patroller to turn his back, then drop down for a silent takedown. If you get spotted, quickly dive into the nearby bushes to pick off the remaining enemies from cover. Once the area is clear, step under the shelter, grab the chest resting against the back wall, and make your escape. Rewards:
| ||
| Salvage CrateArroyos | Arroyos | From the main dock, head toward the center of the fishing village. Take a left at the large central boardwalk and continue straight to find the blue salvage crate resting just ahead. Rewards:
| ||
| Salvage ChestTulum | Tulum | From your moored ship, head straight across the makeshift boardwalks and boat wreckage to reach the mainland. Look for a rock wall with a ladder up ahead; the salvage chest is just to the left, resting against the wall. Rewards:
| ||
| Salvage ChestLong Bay | Long Bay | Located down below in the forest area, resting directly beside what appears to be a sacrificial altar. Chest Coordinates: 506, 220 Rewards
| ||
| Salvage ChestLong Bay | Long Bay | Found on the upper level, behind a waterfall, right beside a skeleton. Chest Coordinates:m 503, 223. Rewards:
| ||
| Salvage CrateAmbergris Key | Ambergris Key | Located in the restricted section of the Smuggler's Den. Find it against the back western wall next to an alcove with two working laborers (who are also enemies fyi) Rewards:
| ||
| Salvage CrateAmbergris Key | Ambergris Key | Located in the restricted section of the Smuggler's Den. Find it against the southern wall, right beside the stairs leading to the exit. Rewards:
| ||
| Salvage CrateCaribbean Sea | Caribbean Sea | |||
| Salvage CrateFort Serranilla | Fort Serranilla | Right outside the war room door on your left, underneath a small covered tent area. Rewards:
| ||
| Salvage CrateCaribbean Sea | Caribbean Sea | |||
| Salvage CrateCaribbean Sea | Caribbean Sea | Can be located on the western beach of the unnamed island east of New Bone. Rewards:
| ||
| Salvage ChestCaribbean Sea | Caribbean Sea | This salvage chest can be found inside the tent on the eastern beach of the unnamed island east of New Bone. Rewards:
| ||
| Salvage ChestCaribbean Sea | Caribbean Sea | This chest can be found towards the center of the small island, inside of the old camp. Chest Coordinates: 362, 175, Rewards:
| ||
| Salvage CrateCaribbean Sea | Caribbean Sea | Located up the stairs to the small Mayan ruin, just south of the central camp. Crate Coordinates: 363, 172. Rewards:
| ||
| Salvage ChestCaribbean Sea | Caribbean Sea | Found on the lower level of the mayan ruin that lies just south of the small islands' central camp. Chest Coordinates: 362, 172. Rewards:
| ||
| Salvage ChestCaribbean Sea | Caribbean Sea | Look for this salvage chest on the northeastern side of the island. Head right to the edge of the island and look down. You should spot a half-sunken rowboat with the chest right on top. Chest Coordinates: 364, 178. Rewards:
| ||
| Salvage ChestTulum | Tulum | Located in the small clearing where the second jaguar spawns. Take the southeastern path from the Northern Ruins to reach this area, and look for the salvage chest resting beside the pool of water on the southern edge. Chest Coordinates: 38, 382. Note: This location is not accessible until AFTER you've finished the main quests for this area. Rewards:
| ||
| Salvage CrateCaribbean Sea | Caribbean Sea | Located on the small, unnamed island slightly southeast of Tulum. From the northwestern beach, head toward the ancient Maya ruins and climb the eastern side. Halfway up, follow the stone walkway deviating to your right. Pass through the open stone doorway to find the chest just around the corner, in front of the structure facing out over the ocean. Chest Coordinates: 112, 376. Rewards:
| ||
| Salvage CrateMisteriosa | Misteriosa | This salvage crate is located on the middle-upper level of the Mayan ruins on the northwest side. Look for it resting on top of the building-like structure that contains Chest #3. Crate Coordinates: 267, 176. Rewards:
| ||
| Salvage CratePinos Isle | Pinos Isle | From the northeastern beach inside the cove, head past the shipwreck and ruins, then climb the wooden rafters on the back side of the area. As soon as you pull yourself up, look past Maya Stela #1 on your left, and head right through the open stone archway to find this crate. Rewards:
| ||
| Salvage ChestPinos Isle | Pinos Isle | Located in the northwestern ruins, just outside the restricted zone's perimeter. Find the tower holding the area's viewpoint and search the very top right next to it to find this chest. Chest Coordinates: 303, 455. Rewards:
| ||
| Salvage CratePinos Isle | Pinos Isle | Located in the southwestern corner of Pinos Isle, near the second black jaguar den. Head up into the ruined stone structure to find this salvage crate resting up on the stone walkway. Crate Coordinates: 307, 448. Rewards:
| ||
| Salvage ChestCape Bonavista | Cape Bonavista | Located on the north-central side of Cape Bonavista, near the jaguar hunting ground. Search the small camp where the jaguar spawns to find this salvage crate resting against the rock face. Chest Coordinates: 161, 592. Rewards:
| ||
| Salvage ChestSacrifice Island | Sacrifice Island | Located right beside the small disheveled wooden pier near the Animus Rift. Rewards:
| ||
| Salvage ChestCape Bonavista | Cape Bonavista | Located inside the restricted enemy camp in the north-central part of the island, north of the jaguar lair. From Secret #1, head a few steps south down the creek to find this chest resting on the bank next to some empty crates. Chest Coordinates: 160, 596. Rewards:
| ||
| Salvage ChestCape Bonavista | Cape Bonavista | To locate this salvage chest, head for Cape Bonavista Viewpoint #1. Approach the viewpoint from the northern side, but just before you scale the wooden rafters to the top, pause and look to your right. You will spot a circular depression in the ground where this salvage chest rests beside a forgotten skeleton. Chest Coordinates: 157, 596. Rewards:
| ||
| Salvage CrateCape Bonavista | Cape Bonavista | Located in southeastern Cape Bonavista, right outside the cave containing the area's treasure map. Approach from the north and head up the stairs to find this salvage crate sitting on your right, surrounded by skeletons. Crate Coordinates: 162, 584. Rewards:
| ||
| Salvage CrateCape Bonavista | Cape Bonavista | Located at the tree-hut village in the southeastern area. Instead of taking the stairs up, look for a cave entrance at ground level. Head inside and look immediately to your left to find this salvage crate. Crate Coordinates: 163, 585. Rewards:
| ||
| Salvage ChestCape Bonavista | Cape Bonavista | Located near the tree-hut village in the southeastern area. Instead of taking the stairs up, look for a cave entrance at ground level. Head inside and head all the way to the end. Back outside, head to the upper wooden platform ahead to find the chest resting right next to a skeleton. Crate Coordinates: 163,582. Rewards:
| ||
| Salvage ChestAbaco Island | Abaco Island | This salvage chest will be located inside a tent in the enemy camp. Note: This chest will only spawn during the local event "A Just Reward." Rewards:
| ||
| Salvage CrateAbaco Island | Abaco Island | This salvage crate can be found on the large ship that appears during the local event "A Just Reward". Crate Coordinates: 583, 810. Note: This crate will not appear until this event has spawned upon your second visit to the island. Rewards:
| ||
| Salvage CrateCape Bonavista | Cape Bonavista | To locate this crate, head southwest, climb up several wooden platforms until you reach one that appears to have a large wooden gate at the top of it connected to the cliffside. You'll find this blue crate on your right. Rewards:
| ||
| Salvage CrateCape Bonavista | Cape Bonavista | Located on the north-central side of Cape Bonavista, near the jaguar hunting ground. Search the small camp where the jaguar spawns to find this salvage crate resting against the rock face. Crate Coordinates: 161, 592. Rewards:
| ||
| Salvage ChestCaribbean Sea | Caribbean Sea | Found in the mangrove thicket in the northern part of the island. Rewards:
| ||
| Salvage CrateCaribbean Sea | Caribbean Sea | Found in the mangrove thicket in the northern part of the island. Rewards:
| ||
| Salvage CrateCaribbean Sea | Caribbean Sea | Found in the mangrove thicket towards the center part of the island, right next to a skeleton. Rewards:
| ||
| Salvage CrateNassau | Nassau | Head to the northwestern beach of Nassau to track down this salvage crate! Take the northbound road up to the beach from Nassau General Store #4 on the western side of town. Once you hit the sand, turn left and follow the coastline all the way to the very end, passing a dock on your way. You will find your loot tucked right underneath a palm tree!
Rewards:
| ||
| Salvage CrateNassau | Nassau | Found on the far western side of Nassau in the crocodile swamp. Follow the leaning tree branches west until you're above a central island in the middle of the swamp. Take the right branch (grabbing the Animus Keys along the way) to the far side, then drop down into the camp below to find the crate next to a stack of boxes.
Rewards:
| ||
| Salvage CrateCape Bonavista | Cape Bonavista | This chest can be found on one of the circular wooden platforms that are wrapped around a tree. | ||
| Salvage CrateCape Bonavista | Cape Bonavista | Search the ground level beneath the abandoned village's wooden tree platforms to find this blue crate. Crate Coordinates: 161, 589. Rewards:
| ||
| Salvage CrateCape Bonavista | Cape Bonavista | During the quest "Sequence 1-Edward Kenway", specifically during the objective—Free the Merchant—before making your way down to the beach where the enemies are located, take a detour to your left until you reach a small clearing where you will find this chest resting near some wooden boat scraps. | ||
| Salvage CrateCape Bonavista | Cape Bonavista | During the quest "Sequence 1-Edward Kenway", specifically during the objective—Free the Merchant—pause before making your way over to the section of beach where the enemies are located on your left. Instead, head to the right side perimeter of this area and follow it all the way down to the ocean. Right beside a leaning palm tree and some rocky cliffs, you will find the salvage crate. Rewards:
| ||
| Salvage CrateHavana | Havana | Located just north of Havana Viewpoint #3. Follow the side road past the dancing revelers to find this chest tucked against a wall near the water's edge at the harbor. | ||
| Salvage CrateHavana | Havana | Head northeast from Havana Viewpoint #3 (the large church) down toward the docks. You'll find this crate sitting under a covered section just past Havana Harbourmaster #1. Rewards:
| ||
| Salvage CrateHavana | Havana | Navigate through the alleyway into a small courtyard to find this crate sitting directly beneath the covered shelter. Rewards:
| ||
| Salvage CrateHavana | Havana | This crate can be found down by the docks, right next to a large white open building with archways and stone columns. Rewards:
| ||
| Salvage CrateNassau | Nassau | You can find this salvage crate on the outskirts of town in southwestern Nassau. You will find it just off the side of the road next to a rock wall, sitting directly underneath a natural rock bridge. Rewards:
| ||
| Salvage CrateNassau | Nassau | You can locate this salvage crate on the southwestern beach of Nassau. Head south from the main road, pass under a rock bridge, and once you reach the sand, you will find the crate sitting just off to the side. Rewards:
| ||
| Salvage CrateNassau | Nassau | Find this salvage crate on the southern beach of Nassau. Look for it tucked among a group of other crates across from the nearby rowboat. Rewards:
| ||
| Salvage CrateNassau | Nassau | You can find this salvage crate on Nassau's southernmost beach, just outside the perimeter of the restricted area above it. Look for a roaring fire at night, and you will easily spot the crate close to the water's edge. Rewards:
| ||
| Salvage CrateNassau | Nassau | Head to Nassau's southeastern beaches to track down this salvage chest! You'll find it just southeast of Nassau Viewpoint #4, sitting barely outside the northeastern perimeter of the nearby restricted area. Look for a small alcove carved into the rocky cliffs, and you'll spot the chest hidden among some barrels!
Rewards:
| ||
| Salvage CrateNassau | Nassau | This salvage crate can be found just off the side of the road heading south towards Nassau Viewpoint #4 in western Nassau. Rewards:
| ||
| Salvage CratePetite Caverne | Petite Caverne | Located on the southern side of the beach, just outside the cave entrance. Look for this salvage crate resting directly against the rock face. Rewards:
| ||
| Salvage CratePetite Caverne | Petite Caverne | From the cave entrance, head toward the right-hand boardwalks running alongside the cave wall. Take out any enemies as you go and follow the path all the way around until you are underneath a small thatched-roof pavilion. From there, look to your right to find this salvage crate tucked into a corner against the rock face. Chest Coordinates: 863, 239. Rewards:
| ||
| Salvage ChestHavana | Havana | Head back through the building's alleyway until it opens into a small courtyard. You will find this salvage chest tucked right underneath the covered shelter. | ||
| Salvage ChestHavana | Havana | Head north on the main road toward Harbourmaster #2. Turn left at the crossroads, then immediately left through the nearby building's open doorway. Walk through to the back courtyard and look left to find the chest under the porch. Rewards:
| ||
| Salvage CrateHavana | Havana | Head west from General Store #3 down the narrow alleyway to a yellow-topped stall. Use the tilted cart to climb the building, cross the roof, and drop into the courtyard below. Find the blue salvage crate in the south corner among the barrels. Rewards:
| ||
| Salvage CrateHavana | Havana | Head to the far eastern edge of the docks to locate this crate tucked neatly into a corner. It rests a short walk northeast of General Store #3 and just northwest of the "Derby Ram" Sea Shanty. Rewards:
| ||
| Salvage ChestHavana | Havana | Head west away from the docks until you see a large tree on your left. Look right to spot a tilted cart against the wall, climb over it, and cross the wooden beams. Drop down next to the staircase on your right to find this chest tucked safely beside it. | ||
| Salvage CrateHavana | Havana | Head to the northeastern docks to find this crate resting high up on a balcony. You will be right next door to this spot during the "...And My Sugar?" memory, where Captain Mendoza is preparing to send a pirate to the gallows. Rewards:
| ||
| Salvage CrateHavana | Havana | Make your way to the northeastern docks and scale the yellow building to find this chest on a small rooftop balcony. You will be right next door to this location during "...And My Sugar?", just as Captain Mendoza prepares to send a pirate to the gallows. Rewards:
| ||
| Salvage ChestHavana | Havana | From the covered shelter on the south side of the docks, head north and watch for a chest on your left—resting against an upturned rowboat along the dock. Rewards:
| ||
| Salvage ChestPetite Caverne | Petite Caverne | This salvage chest can be found on the top level in this area, on the southern side of the cave. It will be just a few steps ahead from where you looted the Secret Chest. Rewards:
| ||
| Salvage CrateHavana | Havana | Stand facing the Havana Gallows (visited during the "...And My Sugar?" quest) and turn around to spot an orange and blue building on your left. Climb the ladder on its side, cross to the far end of the balcony, and drop into the small courtyard below to find this blue crate directly behind you. Rewards:
| ||
| Salvage ChestHavana | Havana | Stand facing the Havana Gallows (visited during the "...And My Sugar?" quest) and turn around to spot an orange and blue building on your left. Climb the ladder on its side to reach the roof, then cross straight to the opposite edge. Look down to find this chest on your left, resting near a well. Rewards:
| ||
| Salvage ChestHavana | Havana | With the Havana Gallows on your right, move north down the street until you spot a tilted cart against a building. Step through the open doorway next to the cart and vault straight out the back window. In the small courtyard you land in, you will find this salvage chest against the opposite wall. Rewards:
| ||
| Salvage ChestHavana | Havana | With the Havana Gallows on your right, move north down the street until you spot a well on your left. Veer left toward the back wall with the barrels, then turn right through the open doorway. Turn left onto the porch, then left again into a narrow alley. Scale the ladder, hop across the wooden rafter, and drop down into the enclosed area to claim this chest along the north wall. Rewards:
| ||
| Salvage ChestHavana | Havana | You can find this chest resting on a balcony just north of General Store #4. Walk down the street until you locate a bright blue building on your left featuring a hanging sign that reads "Sireni Nori Dira." To claim your loot, simply scale the wall to the balcony of the matching blue building positioned immediately to its right. Rewards:
| ||
| Salvage CrateHavana | Havana | From the Havana Chest #7 courtyard, face the western wall. Skip the ground-floor entrances and climb up to the second-level balcony. Step through the open doorway to find the large blue crate. Rewards:
| ||
| Salvage CrateHavana | Havana | This crate is located directly in the northernmost corner of the fort. You will find it resting just a few steps north of the initial infiltration point. Rewards:
| ||
| Salvage ChestHavana | Havana | This chest is located directly in the westernmost corner of the fort. You will find it resting just a few steps south of the initial infiltration point and right below Havana Viewpoint #7. Rewards:
| ||
| Salvage CrateHavana | Havana | This crate is located directly in the southernmost corner of the fort. It will be near where Captain Mendozo is roaming around during the "...And My Sugar?" quest. Rewards:
| ||
| Salvage ChestHavana | Havana | You'll find this chest tucked up against the back wall on the eastern side of the fort. Rewards:
| ||
| Salvage CrateHavana | Havana | This crate is located directly in the easternmost corner of the fort, up against the wall near a large cannon. Rewards:
| ||
| Salvage ChestHavana | Havana | Head to the fort's lower level to find this crate on the courtyard's right wall. Slip down the stairs into the hay cart for cover. Ambush the patrolling guard, then silently take down the second. Open the chest where the second guard stood, then grab the salvage crate against the right wall. Rewards:
| ||
| Salvage CrateHavana | Havana | Head to the fort's lower level to find this crate on the courtyard's right wall. Slip down the stairs into the hay cart for cover. Ambush the patrolling guard, then silently take down the second. Open the chest where the second guard stood, then grab the salvage crate against the right wall. Rewards:
| ||
| Salvage ChestHavana | Havana | Head down the stairs to the fort's bottom level, clearing enemies along the way. In the main courtyard, go through the open stone archway on the eastern wall. Ambush the guard around the right corner, then silently take down the second in the next room. Enjoy a quick pirate moment with the parrot, then open the crate on the back left wall. Rewards:
| ||
| Salvage CrateHavana | Havana | From the lower courtyard, head through the southeastern archway onto the docks. Wait for the lower guard on the stairs to turn away, then stealth-kill the top guard. When the remaining guard turns his back, silently take him out as well. Grab the salvage crate tucked in a corner to the left of the final guard. Rewards:
| ||
| Salvage CrateHavana | Havana | You can find this salvage crate at the end of the dock that runs along the southern side of "Castillo de la Real Fuerza ". Rewards:
| ||
| Salvage CrateSalt Key Bank | Salt Key Bank | From the starting dock, head past the Local Officer, go up the first set of stairs, and take the right staircase to the top. Run past the elevated structures on your left and follow the path up until you run straight into the crate which you'll find in a small clearing by the mountain wall, next to a fence. Rewards:
| ||
| Salvage CrateCaribbean Sea | Caribbean Sea | Start at the southeastern shore and head through the water past the creepy rock archway. Once you hit land, climb the leaning tree on your right and jump across the wooden posts to reach a platform. You will find the salvage crate sitting right against the wall. Salvage Crate Coordinates: 596, 307. Rewards:
| ||
| Salvage ChestHavana | Havana | Make your way west-northwest, heading away from the Castillo de la Real Fuerza, until you spot a stream on your right running alongside the city walls. Head down into the water and follow the stream until you reach a skeleton on your left. You will find this small blue chest sitting right beside it. Rewards:
| ||
| Salvage ChestHavana | Havana | Head north down the main road to the large fountain in the courtyard. Take a right and scale the yellow building on your left. Ignore the bell tower (Havana Viewpoint #8) for now, cross directly to the opposite side of the roof, and look left to find the chest resting on a small balcony next to a barrel. Rewards:
| ||
| Salvage ChestHavana | Havana | Head west along Havana's northern wall in northwestern Havana to locate this salvage chest in a restricted area's courtyard. Infiltration Method: Climb the crates and balcony near the "Frederico-Ancla Canyao" sign. Facing three rooftop sentries and five ground guards, eliminate the first guard on your right. Move south to strike the second guard from above, then eliminate the final lookout on the highest roof. Drop to the pergola and into the left-side bushes. Silently take out the lone guard at the northern entrance. Loot the chest under the overhang, and escape quickly before any other guards are alerted. Rewards:
| ||
| Salvage CrateHavana | Havana | From Havana City's northern entrance, take the first right down the main road and climb the building directly in front of the pig stalls. Cross the roof, face south, and look down to spot the blue salvage crate in the southern corner below. Rewards:
| ||
| Salvage ChestHavana | Havana | From Havana City's northern entrance, head south down the main road past the pig stalls on your right. At the split in the road marked by a half-stone wall, veer left toward the ivy-covered building directly ahead. Climb over its wooden door to find this chest sitting next to a dead man. Rewards:
| ||
| Salvage CrateCaribbean Sea | Caribbean Sea | Found on a small, unnamed island just east of Andreas Island. This chest sits on the northern side of the island near the beach, resting on the porch of an old, abandoned shack.
Rewards:
| ||
| Salvage CrateCaribbean Sea | Caribbean Sea | Found on a small, unnamed island just east of Andreas Island. This chest sits on the southern side of the island, tucked next to a rock wall right beside the tree you climb to reach the Animus Key.
Rewards:
| ||
| Salvage CrateCat Island | Cat Island | This salvage crate is located on Cat Island, directly underneath the tall guard tower toward the southeast part of the hostile area. Be mindful of the guards who keep watch over this vicinity, especially the lookout stationed at the top of the watchtower.
Rewards:
| ||
| Salvage CrateCat Island | Cat Island | This salvage chest can be found in the far southern area of the hostile plantation on Cat Island. The chest is located on the back patio directly behind the Manor, near an objective for the "Sugarcane and Its Yields" quest.
Rewards:
| ||
| Salvage CrateSalt Lagoon | Salt Lagoon | On the southwestern side of the Salt Lagoon island, you can find this salvage chest right off the path from a camp fire. It'll be next to a chair where you can sit and read a lovely poem.
Rewards:
| ||
| Salvage CrateSalt Lagoon | Salt Lagoon | This salvage chest can be found on the northwest side of the island, right by the rowboat in the area. Look for it on the beach.
Rewards:
| ||
| Salvage CrateSalt Lagoon | Salt Lagoon | This salvage crate is at the northernmost point of the Salt Lake Lagoon Island. Look for it on the beach.
Rewards:
| ||
| Salvage CrateSalt Lagoon | Salt Lagoon | This salvage crate is found on the beach along the eastern side of the Salt Lagoon Island. Look for it near a camp that also serves as the starting location for the "Proper Defenses" quest.
Rewards:
| ||
| Salvage ChestHavana | Havana | From Havana Viewpoint #6, backtrack across the wooden beam. Head west across the platform toward the circular structure, but hit the brakes just before you go around it! Peek over the western edge and use Eagle Vision—you'll spot the salvage chest glowing just below on your right. Climb down the rafters to its level and claim the loot tucked against the wall. Rewards:
| ||
| Salvage CrateMariguana Island | Mariguana Island | Found on the south side of Mariguana Island. Look for a small, rocky outcropping extending from the shore. Head to the very end and check behind the largest rock for the chest.
Rewards:
| ||
| Salvage CrateMariguana Island | Mariguana Island | Found on the northwest side of Mariguana Island. After docking, head toward the shore and follow the path straight. Veer right at the rock overpass and follow the coast to the end of the island. Head through the second rock overpass on your left to find the crate and some wild pigs.
Rewards:
| ||
| Salvage CrateMariguana Island | Mariguana Island | Found in the center of Mariguana Island. After docking, head toward the shore and follow the path straight. At the rock overpass, veer right, then take the first left to find the chest tucked against the rock wall.
Rewards:
| ||
| Salvage CrateMariguana Island | Mariguana Island | Found on the northeast side of Mariguana Island. After docking, head toward the shore and immediately veer right. The chest is located at the very end of the first dock. Rewards:
| ||
| Salvage ChestHavana | Havana | From Havana General Store #6, head right. Go left toward the yellow building, right, and then left down the road past the red "Habana Tobaco" sign. Continue straight through the first crossroads and turn right at the second. Turn right again through the open archway with the red "Pallo Antwan-Taurina's Goods" sign. Step into the pergola on your right to find the chest against the east wall. Rewards:
| ||
| Salvage ChestHavana | Havana | This salvage chest can be found in western Havana. To get there, head left down the main road, away from Havana General Store #6, toward the yellow building on your right. Turn right at the first crossroads, pass the merchant stall in the center of the road, and head up the flight of stairs next to it. Immediately look left to spot an open archway on the side of the building next to a boarded-up section. Duck inside this small space to find the chest waiting on your left. Rewards:
| ||
| Salvage CrateHavana | Havana | This salvage crate can be found in western Havana City. From behind Havana General Store #6, face southeast toward the main road. Activate Eagle Vision to spot the glowing loot ahead. Follow the road straight through the open archway of the teal building flanked by two yellow ones. Just inside, you'll find the salvage crate next to a tree on your left. Rewards:
| ||
| Salvage ChestHavana | Havana | This salvage chest can be found in western Havana City. Start with your back to General Store #6, head left toward the yellow building, and then right at the first crossroads. At the hay cart crossroads, take the left branch. Just before the palm trees, turn left, then immediately left into the alleyway. Find the teal building with stone columns and an attached pergola. Step inside the pergola and look behind the back wooden wall to find the chest on your right. Rewards:
| ||
| Salvage ChestHavana | Havana | From behind Havana General Store #6, face north toward the Havana Cathedral. Walk to the front steps, veer right, and cut left into the courtyard. Climb the wooden rafters on the left wall, grabbing the other salvage chest on your way up. Scale to the top rafter beside the cathedral dome (near Havana Viewpoint #6) to find the chest on a table next to a barrel. Rewards:
| ||
| Salvage ChestHavana | Havana | From the back of Havana General Store #6, walk to the Havana Cathedral steps and veer right. Take a quick left into the courtyard, look up to your left, and climb two sets of wooden rafters. Use Eagle Vision to spot the chest ahead. Climb the next set of rafters, move to the far right corner of the platform, and drop down to find the chest against the north wall. Note: Havana Viewpoint #6 and another salvage crate are just above this spot, so be sure to synchronize and grab that extra loot if you haven't yet.
Rewards:
| ||
| Salvage CrateGreat Inagua | Great Inagua | This chest is located in western Great Inagua. While following the path from the ruins during the "A Single Madman" quest, slide under the tree log and vines to emerge into a stunning new area filled with waterfalls and towering cliffsides. Look straight ahead to spot the chest resting on a detached outcropping, and simply jump across to claim it. Chest coordinates: 808, 440. Rewards:
| ||
| Salvage CrateGreat Inagua | Great Inagua | Found in southwestern Great Inagua. Head north on the main path and descend the hill to spot a small enemy camp below during the "A Single Madman" quest. Clear out the enemies to safely loot the crate in the center of the camp. Chest coordinates: 810, 435.
Rewards:
| ||
| Salvage CrateGreat Inagua | Great Inagua | Found in southwestern Great Inagua. Head north on the main path, pass the first climbable tree branch, and veer onto the right-hand path. Continue until you spot a second tree branch on your left. Cross it to reach a small platform on top of the hill to find the chest.
Rewards:
| ||
| Salvage CrateGreat Inagua | Great Inagua |
Found atop the large ruins in the southwestern part of Great Inagua. Scale the ruin walls, cross the wooden boardwalk to the right, then immediately veer right. Climb over the wall with the hanging cloth to find the chest tucked in a corner.
Rewards:
| ||
| Salvage CrateGreat Inagua | Great Inagua | Found on Great Inagua during the "A Single Madman" quest. Swim ashore and head straight to the ruins. Climb the wall, and as you near the top, ignore the wooden boardwalk on your right. Instead, head left onto a stone platform to find the chest.
Rewards:
| ||
| Salvage CrateGreat Inagua | Great Inagua | Track down this chest in western Great Inagua! While following the path from the ruins during the "A Single Madman" quest, slide under the tree log and vines to emerge into a stunning new area filled with waterfalls and towering cliffsides. Follow the jungle path and take to the canopy, using the tree branches to reach a wooden platform. Continue navigating the branches—using vines to swing across gaps as necessary—until you finally land on the wooden platform where this chest is resting.
Chest coordinates: 813, 438.
Rewards:
| ||
| Salvage CrateGreat Inagua | Great Inagua | Found in Great Inagua on the back right (east) side of du Casse's manor. Located directly above Secret #4. Climb the wall next to the waterwheel to reach the platform holding the chest.
Rewards:
| ||
| Salvage ChestHavana | Havana | You'll find the crate in western Havana. Head down the main road going west from Havana Cathedral and look for it up on a balcony. Rewards:
| ||
| Salvage ChestHavana | Havana | This crate can be found in western Havana City. Head west on the main road heading away from Havana Cathedral, and turn right into a small courtyard. Look for the crate inside a pergola behind some other wooden crates. Rewards:
| ||
| Salvage CrateHavana | Havana | This salvage crate can be found in Western Havana. It will be right along the western border wall in a small encampment of citizens. Rewards:
| ||
| Salvage CrateHavana | Havana | You can find this salvage crate right on the western side of Havana City. It's located near Havana Viewpoint #7, along the western border wall in a small market area. Rewards:
| ||
| Salvage CrateHavana | Havana | You can find this salvage crate in western Havana City. It will be along the western border wall right before you reach the Governor's Prisons location. This will technically be a restricted area, so watch out for the 2 guards. Rewards:
| ||
| Salvage ChestHavana | Havana | You can find this salvage chest in southwestern Havana City. It will be just a few steps to the west of Havana General Store #8. You'll find it right underneath a building overhang. Rewards:
| ||
| Salvage CrateHavana | Havana | To locate this salvage crate, head to southwestern Havana. Make your way south down the street towards Havana General Store #8. You'll find the crate sitting right in the middle of a courtyard market, directly across from the general's store's front door. Rewards:
| ||
| Salvage ChestHavana | Havana | This salvage chest can be found in western Havana City. Head out from Havana General Store #7 and pass through the open archway straight ahead. Look for the boarded-up pergola attached to the building on your right. Head inside to find this chest. Rewards:
| ||
| Salvage ChestHavana | Havana | Head north down the main road to the black and red "Fernadia-Hensen & Barkly" sign on your left. Use Eagle Vision to spot the glowing loot behind the wooden door ahead. Climb over the door and drop down to find the salvage chest on a bench to your left. Rewards:
| ||
| Salvage ChestHavana | Havana | Navigate to central-western Havana to locate this salvage crate sitting on the southern side of a restricted area's courtyard. Infiltration Method: Enemies patrol the entire perimeter, so start up high by eliminating the two rooftop guards first. Drop down and use the central bushes to silently take out the two guards stationed in the middle of the courtyard. As long as you don't cause a commotion, the remaining guards will keep their backs turned. Loot your crate, and make sure to grab the other salvage chest along the courtyard's northwest wall before you slip away! Rewards:
| ||
| Salvage ChestHavana | Havana | Navigate to central-western Havana to locate this salvage crate sitting on the northwest side of a restricted area's courtyard. Infiltration Method: Enemies patrol the entire perimeter, so start up high by eliminating the two rooftop guards first. Drop down and use the central bushes to silently take out the two guards stationed in the middle of the courtyard. As long as you don't cause a commotion, the remaining guards will keep their backs turned. Loot your crate, and make sure to grab the other salvage chest along the courtyard's southern wall before you slip away! Rewards:
| ||
| Salvage ChestHavana | Havana | Navigate to central-western Havana, just west of Havana Harbourmaster #6. Head through the open archway of the nearby orange building to find this salvage crate tucked behind a tree with mushrooms growing out of it. Rewards:
| ||
| Salvage ChestHavana | Havana | From Havana Viewpoint #6, backtrack across the wooden beam and head west toward the circular structure. Climb down the rafters to the lower level. Jump from the western edge to the roof ahead, then drop to the ground. Spot the chest on your right with Eagle Vision, and crouch through the half-boarded-up doorway to grab the loot. Rewards:
| ||
| Salvage ChestHavana | Havana | This salvage chest can be found in central Havana, just south of Havana Harbourmaster #6. From the main courtyard near the harbourmaster, take the stairs south through the open archway into a smaller courtyard. You'll find this salvage chest resting against the back southern wall, with Havana Chest #5 sitting just behind it up in the pergola. Rewards:
| ||
| Salvage CrateHavana | Havana | This salvage crate is located in the southern half of central Havana, just east of Havana Viewpoint #4. You'll find this salvage crate tucked in a back alleyway under a building overhang, just on the other side of the wall from Havana Chest #4. Rewards:
| ||
| Salvage ChestHavana | Havana | Located in south-central Havana, east of Havana Manor (Havana Viewpoint #4). Head east down the main road away from the manor until you spot a corner building with a powder-blue top level. Look for an open doorway on the left side of the building and step inside to find this loot. Rewards:
| ||
| Salvage CrateHavana | Havana | This salvage crate is located in southern Havana, directly underneath Havana Viewpoint #2. The viewpoint is on top of a large yellow church surrounded by civilians and merchant stalls. Head to the northern side of the building to find the crate tucked against the church wall. Rewards:
| ||
| Salvage ChestHavana | Havana | This salvage chest can be found in southern Havana beneath Viewpoint #2 (the large yellow church). Climb the western side of the building and face the decorative orange wall with the stained glass window. You will find the chest right underneath on the ledge. Rewards:
| ||
| Salvage CrateHavana | Havana | This salvage crate can be located along the coastal outskirts of southern Havana. Head to the pirate camp along the beach and find this salvage crate on the northeast side of the camp, tucked under the large covered shelter. Make sure to grab the pirate camp codex and the other two crates while you are in the area. Stealth tip for clearing the pirate camp: If you prefer infiltration, head to the bushes on the far south side of the area toward the beach to take out a few enemies this way. Rewards:
| ||
| Salvage ChestHavana | Havana | This salvage chest can be located in the coastal outskirts of southern Havana. Head to the pirate camp along the beach and find this salvage chest on the southeastern side of the camp, tucked under the small covered shelter. Make sure to grab the pirate camp codex and the other two salvage crates while you're in the area.
Stealth tip for clearing the pirate camp: If you prefer infiltration, head to the bushes on the far south side of the area toward the beach to take out a few enemies this way. Rewards:
| ||
| Salvage ChestHavana | Havana | This salvage chest can be located in the coastal outskirts of southern Havana. Head to the pirate camp along the beach and find this salvage chest on a table in the very middle of the area. Make sure to grab the pirate camp codex and the other two salvage crates while you're in the area.
Stealth tip for clearing the pirate camp: If you prefer infiltration, head to the bushes on the far south side of the area toward the beach to take out a few enemies this way.
Rewards:
| ||
| Salvage ChestHavana | Havana | The exact location of this salvage chest is in central-south Havana, inside the building directly east of Havana Viewpoint #2 and south of Havana General Store #10. To find where this hidden chest is tucked away, climb up to the second floor on the west side of the building and go through the open door to find the loot right inside. Rewards:
| ||
| Salvage ChestHavana | Havana | You can locate this salvage chest in southeastern Havana. To find this loot, head south down the main road away from Havana General Store #10, and look to your left to spot it tucked behind the stone wall near the yellow house. Rewards:
| ||
| Salvage CrateHavana | Havana | The exact location of this salvage chest is in southeastern Havana, close to the southeastern docks. To find this hidden loot, head south of the Basilica Menor de San Francisco de Asis and search its courtyard. You will uncover the chest tucked in a corner next to some stacked crates and a short palm tree.
Rewards:
| ||
| Salvage CrateHavana | Havana | To find this salvage crate in southeastern Havana, head just across the street and east from Havana General Store #11. This will bring you to a large courtyard house. Step into the very center of the quad and weave through the numerous market stalls to uncover the hidden loot tucked beneath a pergola.
Rewards:
| ||
| Salvage ChestHavana | Havana | The exact location of this salvage chest is in southeastern Havana, just across the street and east from Havana General Store #11. This route will bring you to a large courtyard house. Step into the very center of the quad and weave through the numerous market stalls beneath the pergola. Head toward the northeastern corner under the building's overhang to uncover the chest tucked right next to a caged parrot. Rewards:
| ||
| Salvage ChestHavana | Havana | Track down this salvage chest in eastern Havana City by heading west down the road, moving away from the Basílica Menor of San Francisco de Asís and Havana Viewpoint #3. The moment you step into the courtyard of this area, look for the chest tucked behind a stone half wall.
Rewards:
| ||
| Salvage ChestHavana | Havana | Track down this salvage chest in eastern Havana City by pushing toward the eastern docks. You will find it a short distance northeast of Havana General Store #2. Head into the courtyard of the buildings here to uncover the chest in the southwest corner, resting up a short flight of stairs on a porch. Rewards:
| ||
| Salvage CrateHavana | Havana | The location of this salvage chest is in eastern Havana City, toward the eastern docks. If you're collecting the nearby "Billy Riley Shanty," you can easily spot it from the rooftops just a short distance to the northeast. It's also directly north of Havana General Store #2. Look for a corner building with a powder blue second level to uncover this hidden crate resting on the very top of the building on a rooftop balcony. Rewards:
| ||
| Salvage ChestHavana | Havana | Track down this salvage chest in eastern Havana City by heading just down the road to the west from Havana General Store #2. Step into the corner courtyard with the powder blue back wall and look underneath the pergola to find this hidden loot. Rewards:
| ||
| Salvage ChestHavana | Havana | To find this salvage chest in eastern Havana, head northwest from the Basílica Menor of San Francisco de Asís and Viewpoint #3 towards a courtyard house. Once you deal with the enemies, the quickest route is to check the back eastern corner to grab your loot. After dealing with the enemies in the area however you see fit, look in the back eastern corner of this courtyard to uncover this hidden chest. Rewards:
| ||
| Salvage ChestPinos Isle | Pinos Isle | Look for this Salvage chest on the second level on the northern side of the area. It will be inside one of the small stone rooms. Rewards:
| ||
| Salvage ChestHavana | Havana | Uncover this hidden salvage chest in central Havana, located right next to the Havana Tavern. Approach the tavern from the north side, but before stepping inside, cut to the left of the entrance. Pass the stacked barrels and the covered porch to uncover the loot hidden right underneath the balcony. Rewards:
| ||
| Salvage CrateHavana | Havana | Make your way into central Havana to grab this salvage crate located inside the Havana Tavern. Step into the tavern, face south, and ascend the staircase in the back-right corner framed by blue walls. Once you hit the top landing, claim the loot sitting right in front of you! Rewards:
| ||
| Salvage CrateHavana | Havana | Explore the streets of central Havana to secure this salvage crate! Located right around the corner from Havana Viewpoint #1, you simply need to step into the back alleyway and climb onto the raised section of ground to claim your prize.
Rewards:
| ||
| Salvage CrateHavana | Havana | Uncover this salvage crate in central Havana City, located right next to the "Bully In The Alley" Sea Shanty. If you approach the collectible from the southeast, you will easily spot this crate resting on a rooftop balcony connected to the exact rope the shanty sits upon before it flies up and away! Rewards:
| ||
| Salvage ChestHavana | Havana | Head to central Havana City to find this salvage chest near the "Bully In The Alley" Sea Shanty. Approach from the southeast, cross the shanty's rope, and drop off the rooftop. You will find the loot tucked in a corner against the wall on your left.
Rewards:
| ||
| ChestHavana | Havana | Secure this salvage chest in central Havana City by navigating northeast from Havana General Store #9 Once you are in the area northwest of the Havana Tavern, scale the yellow-topped building and step onto the rooftop balcony to extract your loot. Rewards:
| ||
| Salvage ChestHavana | Havana | Search the area in eastern Havana to find this salvage chest, located right beside the building directly northeast of Havana Viewpoint #1. Head into the courtyard of this building and look along the north wall to uncover the crate tucked behind a stack of other crates.
Rewards:
| ||
| Salvage ChestHavana | Havana | Look to the rooftops in eastern Havana, directly northwest of Viewpoint #1. Hop across the buildings toward the courtyard with a large palm tree to quickly grab the chest on the adjacent balcony. Rewards:
| ||
| Salvage CrateHavana | Havana | Uncover this salvage crate in eastern Havana, located directly northwest of Viewpoint #1. Use the rooftops to navigate toward the courtyard with a large palm tree. After spotting the chest on the adjacent balcony, simply drop down into the courtyard below and look in the northwestern corner under the building's overhang to find your crate. Rewards:
| ||
| Salvage ChestHavana | Havana | Search central Havana City just southwest of Harbourmaster #5 for this chest. Head south down the main road, take the first left, and look for the blue building further along the street (it'll be on your right). Round the corner, enter the building's courtyard, and check under the right-side overhang to grab your loot. Rewards:
| ||
| Salvage CrateHavana | Havana | Your quickest route to this salvage chest is in central Havana City, just southwest of Harbourmaster #5. Head south down the main road and take the first left. As soon as you descend the small flight of stairs, turn right and pass through the two open archways on your left. Walk straight ahead to the stone wall, then vault over it to uncover the crate resting against the wall. Rewards:
| ||
| Salvage ChestHavana | Havana | Search the area in central Havana south of General Store #4 for this chest. Stay on the right side of the main road, take a left at the crossroad, and then take the next right. You will enter a small courtyard with the loot waiting on your left. Rewards:
| ||
| Salvage ChestHavana | Havana | This salvage chest is located in central Havana, right outside the building just behind and to the east of Havana Harbourmaster #5. You will find it situated on the upper balcony under the building's overhang, tucked carefully behind one of the boarded-up windows.
Rewards:
| ||
| Salvage CrateHavana | Havana | This salvage chest can be found in northeastern Havana. Head east from General Store #5, pass through the arch, go down the stairs, and turn right at the blue building. Take another right, walk past the next set of stairs on your left, and simply vault over the wooden door to grab the loot tucked in the corner.
Rewards:
| ||
| Salvage ChestHavana | Havana | Your quickest route to this chest in northeastern Havana is heading east from General Store #5. Pass through the arch, descend the stairs, take a right into the alleyway, and then a left. Look for a sign with an anchor symbol on the left and vault over the door. The chest will be right here on the other side. Rewards:
| ||
| Salvage ChestHavana | Havana | Uncover this hidden chest in northern Havana, located just northeast of Havana General Store #5. An easy route to reach this spot is to take the main road south a short distance from the general store. Right after descending the stairs, take the next left, then stop and look up. The corner building here has an open door just above; simply climb up and head inside to find your salvage. Rewards:
| ||
| Salvage ChestHavana | Havana | Search the area in northern Havana to find this chest, situated just northeast of Havana Viewpoint #6 and northwest of Havana Secret #4. Keep an eye out for a yellow and blue building featuring a red tobacco sign out front, and you will find the loot resting on its attached side balcony.
Rewards:
| ||
| Salvage ChestPort Royal | Port Royal | This salvage chest can be found in the center of Port Royal, behind the buildings. It will be very close to where you end up chasing the tax collector in the nearby local event. Chest Coordinates: 604, 134. Rewards:
| ||
| Salvage ChestHavana | Havana | Your next salvage chest is waiting in northern Havana, situated just northeast of Havana Viewpoint #6 and northwest of Havana Secret #4. To locate it, follow the main road heading east and away from the Havana Cathedral. You will find the chest tucked into a small alleyway that branches off from this street.
Rewards:
| ||
| Salvage CrateHavana | Havana | Your quickest route to this salvage crate in northern Havana is heading east from General Store #5. Go down the stairs, skip the first right, and stop at the second. Spot the corner building with a blue top and tan bottom, and simply step through the open door at ground level to grab this crate.
Rewards:
| ||
| Salvage ChestHavana | Havana | Find this salvage chest in northern Havana by heading east from General Store #5. Go down the stairs, skip the first right, and stop at the second. Enter the corner building with a blue top and tan bottom, exit through the back door, and grab the loot waiting at the far end of the area. (You also pass another salvage crate as you first walk in)
Rewards:
| ||
| Salvage ChestPort Royal | Port Royal | Find this salvage chest inside the restricted enemy area of Fort Charles, resting down on the northern dock. Rewards:
| ||
| Salvage CratePort Royal | Port Royal | Find this salvage crate in the northern part of the Fort Charles restricted area, resting on a small dock next to a ship. Rewards:
| ||
| Salvage CrateHavana | Havana | This salvage crate can be found in a restricted area in southern Havana. It will be next to a covered shelter in the southeastern section of this area.
Rewards:
| ||
| Salvage CrateHavana | Havana | This salvage crate can be found in a restricted area in southern Havana. It will be underneath a covered shelter in the southeastern section of this area.
Rewards:
| ||
| Salvage CrateHavana | Havana | This salvage crate can be found in a restricted area in southern Havana. It will be underneath a small covered shelter right up against the southern wall in the southwestern section of this area.
Rewards:
| ||
| Salvage CrateHavana | Havana | This salvage crate can be found in a restricted area in southern Havana. It will be underneath a covered shelter in the northwestern section of this area.
Rewards:
| ||
| Salvage ChestHavana | Havana | Locate this salvage crate at the very top of the Governor's Mansion in southwestern Havana. You will find it situated right under Havana Viewpoint #4, near the gunrunner on the south side of the building.
Rewards:
| ||
| Salvage ChestHavana | Havana | You can find this salvage chest on the grounds of the Governor's Mansion in southwestern Havana. Head to the northern gardens just east of the Governor's Prisons and check the small area with a fountain to grab this salvage. Rewards:• Reales x206 | ||
| Salvage CrateBlack Island | Black Island | Found on the far eastern side of the Black Island Plantation near the viewpoint. The viewpoint is on top of the house's chimney, but the chest is located directly underneath in the attached covered stable area. Rewards:
| ||
| Salvage CrateBlack Island | Black Island | Head to the northwestern side of the Black Island Warehouse. You'll find this salvage crate just off the main path by the fields, tucked right next to a wooden wagon and some storage crates.
Rewards:
| ||
| Salvage CrateBlack Island | Black Island | Found on the northeastern side of Black Island. The chest sits directly in the middle of a small camp enclosed by crumbling stone half-walls and guarded by two soldiers.
Rewards:
| ||
| Salvage CrateCaribbean Sea | Caribbean Sea | |||
| Salvage CrateAbaco Island | Abaco Island | This salvage crate is one of the Unspoiled Crates that are found in the Abaco Island Camp. You'll have to loot it to progress in the This Tyro Captain quest. Rewards:
| ||
| Salvage ChestNassau | Nassau | Head to northern Nassau to claim this salvage crate! Walk south down the main road toward the Tavern and keep an eye out for a building on the right displaying a "Tobacco" sign. Scale the walls to reach the rooftop balcony and secure this loot. Rewards:
| ||
| Salvage ChestNassau | Nassau | This salvage chest can be found in western Nassau, just southwest of the Nassau Tavern. You'll find it inside a building directly behind the Nassau Dancers. Rewards:
| ||
| Salvage CrateNassau | Nassau | Locate this salvage crate in northwestern Nassau, right by the sea. Head to the beach and look for a small fishing hut attached to the docks. You will find the crate sitting on the far side of the dock facing out toward the water. Rewards:
| ||
| Salvage CrateNassau | Nassau | Find this salvage crate by the sea in northwestern Nassau. Locate the fishing hut on the beach, then head west along the shoreline to find the crate on a sinking dock beside a rowboat.
Rewards:
| ||
| Salvage ChestNassau | Nassau | Locate this salvage crate within a restricted area camp in western Nassau. You will find it tucked away underneath a large tree in the center of the makeshift camp.
Rewards:
| ||
| Salvage CrateNassau | Nassau | You can locate this salvage crate on the outskirts of town in western Nassau. Head south from the beach down the main road and look to your right to spot some wild pigs. Just behind them is a large rock cliff. Use Eagle Vision to spot the crate, then utilize the nearby tree limbs to bypass the broken ladder and reach the rocky ledge where it sits.
Rewards:
| ||
| Salvage ChestNassau | Nassau | Head to the outskirts of western Nassau to claim this salvage chest! Walk south from the northwestern beach down the main road. As you round the corner past the swampy wetlands on your right, check the left side of the road for a small dugout beneath a rock to find your loot resting right beside a skeleton.
Rewards:
| ||
| Salvage ChestNassau | Nassau | Hidden within the stone walls of southern Nassau's third viewpoint, this salvage crate awaits. Scale the tower to its open middle tier to claim the chest left inside. Rewards:
| ||
| Salvage CrateCape Bonavista | Cape Bonavista | Head to the north-central section of Cape Bonavista to claim this loot! Climb the nearby hill to reach the wooden gazebo-like structure sitting next to a clothesline, and step inside to find this salvage crate. Crate Coordinates: 156, 596. Rewards:
Location Submitted By: FalseHelixGG | ||
| Salvage CrateCape Bonavista | Cape Bonavista | Located in north-central Cape Bonavista. Find the small bridge leading toward the pond, stand on it, and face north. Look down at the beach below to spot this salvage crate sitting near a palm tree. Crate Coordinates: 153, 597. Rewards:
Location Submitted By: FalseHelixGG | ||
| Salvage CrateHavana | Havana | Rewards:
Location Submitted By: FalseHelixGG | ||
| Salvage CrateHavana | Havana | Rewards:
Location Submitted By: FalseHelixGG | ||
| Salvage ChestNassau | Nassau | Make your way down to the southern beach in Nassau and track down the officer holding the warehouse key. The salvage crate is located directly next to his post, so use the nearby cover to avoid detection from local enemies while securing your goods. Rewards:
| ||
| Salvage CrateNassau | Nassau | Make your way to the southern beach of Nassau to pinpoint this salvage crate. Use nearby landmarks to guide your search: travel directly east from Nassau Harbourmaster #4, or head just southeast from the Nassau Warehouse to find this salvage chest down by the beach.
Rewards:
| ||
| Salvage ChestNassau | Nassau | To reach this salvage chest near Nassau's southernmost beach, start right at the coast just beside the restricted camp. Walk across the large fallen tree extending toward the water, then platform across the adjacent sunken ship to board the docked vessel where this salvage chest is waiting.
Rewards:
| ||
| Salvage ChestNassau | Nassau | This salvage chest is found in the restricted area within the southeastern section of Nassau, right by the ocean. It is located in the very center of the camp, tucked inside one of the main tents.
Rewards:
| ||
| Salvage ChestNassau | Nassau | Head to eastern Nassau, right by the coast, to track down this salvage chest! It is located inside a restricted area guarded by a handful of enemies. Dispatch the camp, then check inside the half-sunken ship sticking out of the water to claim this chest!
Rewards:
| ||
| Salvage ChestNassau | Nassau | Make your way to the eastern side of Nassau near the docks to track down this chest! You'll find it sitting aboard a vessel out in the water. Swim out, climb aboard the docked ship, and grab the loot! Rewards:
| ||
| Salvage CrateSacrifice Island | Sacrifice Island | This salvage chest can be found in the southwestern section of Sacrifice Island, within a restricted area. Swim to the southeastern beach, bypass the guards via the steps, and cross the tree branch to view the camp below. Look for the giant excavation pit in the western corner—you'll find the chest tucked inside a tent just to the right of it.
Rewards:
| ||
| Salvage CrateSacrifice Island | Sacrifice Island | This salvage chest can be found in the southeastern section of Sacrifice Island, within a restricted area. Swim to the southeastern beach, head up the steps to bypass the guards, and take the tree branch across to view the camp from above. You'll find the chest just to your right, hidden under a tent. Rewards:
| ||
| Salvage CrateSacrifice Island | Sacrifice Island | Located on Sacrifice Island in a restricted camp within the ruins, just above the northwestern beach. Head straight toward the ruins and climb all the way to the top. Clear out the three guards in the immediate area, then loot the salvage crate sitting against the wall right beside the campfire.
Rewards:
| ||
| Salvage CrateSacrifice Island | Sacrifice Island | This salvage crate can be found in the southeastern section of Sacrifice Island, within a restricted area. Look for a doorway that leads down into the ruins. Head inside, take out the enemy here, and you'll find the crate in the corner of the room. Rewards:
| ||
| Salvage ChestNassau | Nassau | You can track down this salvage chest in eastern Nassau, just northwest of Nassau Viewpoint #4, along the western road leading up to the viewpoint! Head down the staircase where you grabbed the "Queen Anne's Staircase" codex entry. Once you hit the bottom, veer to your right and slip behind the rock sitting in the small pool of water. You'll find the chest hidden right underneath the small rock overhang.
Rewards:
| ||
| Salvage ChestNassau | Nassau | This salvage chest is located in northeastern Nassau, just southwest of the large fort visited during the "Now Hiring" quest. It can be found on the porch of a small house right off the main road running east of Nassau Viewpoint #5.
Rewards:
| ||
| Salvage ChestNassau | Nassau | Head to central Nassau to secure this salvage chest! You'll find it sitting on the lower-level rooftop balcony of the building directly behind the Nassau Gallows, a location you visit during the "Now Hiring" quest.. Simply climb up to loot it! Rewards:
| ||
| Salvage ChestNassau | Nassau | Head to central Nassau to find this salvage chest! Follow the main road heading east from Nassau Harbourmaster #3 until you reach the second house over. Look for a staircase porch with a blanket pinned across it, and you will find the chest tucked right underneath it.
Rewards:
| ||
| Salvage ChestNassau | Nassau | This salvage crate is a bit tricky to find, as it is located in a secret underground tunnel in central Nassau. One easy route to get there is to stand with your back to Nassau General Store #2, look straight ahead to spot a cart of hay on the right and what appears to be an open doorway to its left. Head toward this doorway to enter the tunnel. Follow the stairs all the way down until you reach a storage room, where the chest will be on your left against the wall.
Rewards:
| ||
| Salvage CrateNassau | Nassau | Head to the northeastern beach in Nassau to find this salvage crate! Starting from the docks where your ship is moored, step onto the beach and immediately turn left. Make your way over to the camp area with the tents, and look underneath the covered pavilion-like structure to claim this salvage.
Rewards:
| ||
| Salvage CrateNassau | Nassau | To locate this salvage crate, head to the northeastern beach in Nassau. Starting from the docks where your ship is moored, step onto the beach and immediately turn left. Make your way over to the camp area with the covered structure and tents. You'll find the crate right behind one of the linen tents on the south side of this camp.
Rewards:
| ||
| Salvage ChestNassau | Nassau | This chest can be found in a water-level cave southwest of Nassau Viewpoint #6, along the cliff wall surrounding the fort you'll have to enter in the "Now Hiring" quest. From the northeastern beach docks, head left past the tent camp toward the cliffs. Swim to the cave with the rowboat, dispatch the two guards in this restricted area, and claim the chest.
Rewards:
| ||
| Salvage ChestSalt Key Bank | Salt Key Bank | Once you finish up at the Harbourmaster during the "Prizes and Plunder" quest, track down this salvage chest on the eastern shore of Salt Key Bank! Head further down the boardwalk, passing the Local Officer, look out to your right before climbing the stairs. You will spot this chest hidden inside a dark rock alcove. Hop across the wooden poles in the water to reach the alcove and loot the chest. Rewards:
| ||
| Salvage CrateSalt Key Bank | Salt Key Bank | This salvage crate is located on the eastern side of Salt Key Bank. From the starting dock, head past the Local Officer. Go up the first set of stairs, take the right staircase to the top, and look for an elevated covered structure on the left. The crate is tucked underneath a small footbridge on the other side of the structure.
Rewards:
| ||
| Salvage CrateSalt Key Bank | Salt Key Bank | This salvage crate is located on the southern side of the village in Salt Key Bank, right next to the waterfall. You can reach it by jumping down from a boardwalk on the western side of the village, or by climbing down a set of wooden rafters from the eastern side.
Rewards:
| ||
| Salvage ChestSalt Key Bank | Salt Key Bank | This salvage chest is located on the southeastern side of Salt Key Bank, just northeast of the waterfall. If you are coming from the boardwalk near the waterfall, head straight, passing under a footbridge and the elevated platforms above. You will find the chest tucked underneath the Salt Key Bank Tavern building, in a small storage area just ahead. Rewards:
| ||
| Salvage CrateSalt Key Bank | Salt Key Bank | Track down this salvage crate in the northeastern section of Salt Key Bank, right near the Tavern. Take the dirt path heading east, moving away from the Tavern. Just a short distance ahead, climb the small set of stairs to find your loot waiting right underneath a covered shelter!
Rewards:
| ||
| Salvage CrateFort Eleuthera | Fort Eleuthera | Grab this salvage chest immediately after securing the stronghold! Step out of the War Room and look to your right to find the chest resting against a wall just a few steps away. Rewards:
| ||
| Salvage CrateFort Eleuthera | Fort Eleuthera | From the ground entrance, go straight up the stairs, turn left, and climb the next flight. At the top, look straight ahead to find the chest against the wall in a grassy corner.
Rewards:
| ||
| Salvage CrateFort Eleuthera | Fort Eleuthera | Located on the lower patrol walkway. Exit the War Room and take the zip line down. Run straight, drop to the walkway below, and follow it left to the very end to find the chest sitting against the wall.
Rewards:
| ||
| Salvage CrateCaribbean Sea | Caribbean Sea | Found on a small unnamed island just south of Fort Eleuthera. It sits down on the beach on the western side of the island, just a tad north of where you'll find the Animus Keys on the tree.
Rewards:
| ||
| Salvage CrateCaribbean Sea | Caribbean Sea | Found on a small, unnamed island just south of Fort Eleuthera. On the southeastern side of the island, there is a wrecked ship sticking half out of the water (where you'll also find an underwater chest). Jump onto the boat and climb across the mast to reach the trail at the top of the cliff. Go to the end of the trail here (don't forget to loot the other salvage at the start of the trail) to find this chest up against the rock cliff on the right.
Rewards:
| ||
| Salvage CrateCaribbean Sea | Caribbean Sea | Found on a small, unnamed island just south of Fort Eleuthera. On the southeastern side of the island, there is a wrecked ship sticking half out of the water (where you'll also find an underwater chest). Jump onto the boat and climb across the mast to reach the trail at the top of the cliff. As soon as you step down, you'll spot the chest just to your right.
Rewards:
| ||
| Salvage CrateJiguey | Jiguey | To claim this salvage crate, navigate to the large open area inside the Jiguey Cave Smuggler's Hideout. Head to the eastern side of the large open area to find this crate sitting next to a tent and a burning campfire, closely guarded by a few enemies. Rewards:
| ||
| Salvage CrateJiguey | Jiguey | |||
| Salvage CrateJiguey | Jiguey | This salvage chest can be found inside the Jiguey smuggler's hideout cave. After entering the cave and reaching the open area with enemies, swim underneath the right-side boardwalk to the very end. (You can also pick up the Animus Keys in the water here). Emerge from the water and climb the building directly behind you to locate the chest on the second floor.
Rewards:
| ||
| Salvage ChestKingston | Kingston | Head into the alleyway behind Kingston General Store #4 and look for an open window on the top floor of the building. Climb up and head inside to find this salvage chest resting against the wall in a small room. Chest Coordinates: 614, 167. Rewards:
| ||
| Salvage ChestKingston | Kingston | Head to central Kingston to track down this salvage chest, located right near the "Hi-Ho Come Roll Me Over" shanty! Search for the building with dancers performing out in the street, then scale the wall to an open window on the top floor. Climb inside to claim this loot. Chest Coordinates: 614, 163. Rewards:
| ||
| Salvage ChestKingston | Kingston | Related Activity:Find this salvage chest in a central Kingston alleyway, right in front of the street dancers. You cannot simply loot it; instead, talk to the man next to the chest and pay 250 Reales to complete the activity. | ||
| Salvage ChestKingston | Kingston | Head down the main road and look for Kingston General Store #7. Once you've reached it, head to the back of the building and look up to spot an open window on the second story. Climb up and inside to find the chest against a wall. Rewards:
| ||
| Salvage ChestKingston | Kingston | Find this salvage chest in central-southern Kingston, just southeast of the Tavern. Locate the bright blue house and check its western side to find the chest up against the building. Chest Coordinates: 611, 160. Rewards:
| ||
| Salvage CrateFort Gibara | Fort Gibara | From the ground floor of Fort Gibara, take the main stairs to the next level. Climb the left staircase and turn right, following the path until you find the chest resting inside a small tunnel area. Rewards:
| ||
| Salvage ChestFort Gibara | Fort Gibara | From the ground-floor entrance of Fort Gibara, go up the main stairs and immediately take two left turns. Walk forward a few steps to find the chest on the ground, just to the right of the crane-like mechanism.
Rewards:
| ||
| Salvage ChestKingston | Kingston | Locate this salvage chest in southeastern Kingston. Find the area featuring a courtyard filled with a garden, and you will discover the chest resting inside one of the houses there. Chest Coordinates: 620, 162. Rewards:
| ||
| Salvage ChestKingston | Kingston | Find this salvage chest in southeastern Kingston on the front porch of a house. Look for three people drinking and fighting at a table right out front to spot the exact building. Chest Coordinates: 620, 159. Rewards:
| ||
| Salvage ChestFort Gibara | Fort Gibara | Descend the upper western wall (where you can also grab some Animus Keys) and drop into the leaf pile below. Turn left and follow the wall to the far side, where the chest sits next to a leaning skeleton. Rewards:
| ||
| Salvage ChestKingston | Kingston | Locate this salvage chest on the southern coast of Kingston, right next to Kingston Harbourmaster #1. Head over to the Harbourmaster building and check around the back to find this chest resting on a bench beneath a covered shelter. Rewards:
| ||
| Salvage CrateKingston | Kingston | This salvage crate can be located inside the bottom level of the tower where you'll find Kingston Viewpoint #1. Rewards:
| ||
| Salvage CrateKingston | Kingston | Locate this salvage crate in far southeastern Kingston, near the coast. Find the old, broken-down barn and climb to its second level, where you will find the crate waiting right inside. Crate Coordinates: 628, 161. Rewards:
| ||
| Salvage CrateKingston | Kingston | This salvage crate can be found on the outskirts of Kingston on its northeastern side. It will be under a covered shelter within a farm. Crate Coordinates: 626, 166. Rewards:
| ||
| Salvage CrateKingston | Kingston | This salvage crate can be located in northeastern Kingston, right outside the walls of the Manor, which is a restricted area. You can it along a muddy street near a covered tent. Rewards:
| ||
| Salvage ChestKingston | Kingston | Located in northeastern Kingston, just south of Kingston Viewpoint #3. It can be found underneath a covered shelter. Chest Coordinates: 621, 175. Rewards:
| ||
| Salvage ChestKingston | Kingston | Located on a rooftop balcony. Look for a blue house with burgundy shutters in northern Kingston, slightly northwest of the nearby viewpoint. Rewards:
| ||
| Salvage ChestKingston | Kingston | From Kingston General Store #5 head south down the main road, and look for the glow of this chest on the right. You can find it on the back porch of a house, underneath a staircase. Rewards:
| ||
| Salvage ChestKingston | Kingston | Found in the courtyard of a large white house, sitting directly underneath a large tree. Chest Coordinates: 613, 172. Rewards:
| ||
| Salvage ChestKingston | Kingston | Inside an open wooden shed attached to a rundown house in northwestern Kingston, slightly southwest of the Kingston Harbourmaster #5. There will be 2 men arguing right outside. Chest Coordinates: 613, 178. Rewards:
| ||
| Salvage ChestKingston | Kingston | Found on the rooftop patio of a multi-level house just south of Kingston Viewpoint #3. Chest Coordinates: 620, 174. Rewards:
| ||
| Salvage ChestKingston | Kingston | Head to the back of Kingston General Store #3 in central Kingston. Look for the open window on the second story above. Climb through to find this chest up against a wall. Rewards:
| ||
| Salvage CrateCaribbean Sea | Caribbean Sea | Set sail across the Caribbean Sea to a small island in the Gibara region to locate this salvage crate. You'll find it on the northeast side of the island through a short cave and the back beach near dancing NPC's. Crate Coordinates: 547, 632 Rewards:
| ||
| Salvage ChestKingston | Kingston | This salvage chest can be found underneath a covered stone porch in east-central Kingston. Chest Coordinates: 622, 172. Rewards:
| ||
| Salvage CrateCaribbean Sea | Caribbean Sea | Set sail across the Caribbean Sea to a small island in the Gibara region to locate this salvage crate. You'll find it on the southwest side of the beach, right next to the General Store. Crate Coordinates: 547, 632 Rewards:
| ||
| Salvage ChestCaribbean Sea | Caribbean Sea | Set sail across the Caribbean Sea to a small island in the Gibara region to locate this salvage crate. You'll find it on the southern side of the island right behind the General Store on a small platform. Crate Coordinates: 547, 632 Rewards:
| ||
| Salvage CrateAndreas Island | Andreas Island | Found on the northeast side of Andreas Island near the ship dock and harbourmaster. Disembark your ship, head toward the harbourmaster, and veer right toward the small waterfront shack. The crate is located on the front porch.
Rewards:
| ||
| Salvage ChestAndreas Island | Andreas Island | Found on the northwestern beach of Andreas Island, near the viewpoint. Approach the viewpoint from the north along the coast to find a small campsite just before it. The chest is located right here.
Rewards:
| ||
| Salvage CrateAndreas Island | Andreas Island | This salvage crate is located on the western side of Andreas Island. As soon as you jump from the Viewpoint, you will land directly in front of this crate, which is situated just beside the covered shelter of the Andreas Island Tavern.
Rewards:
| ||
| Salvage CrateAndreas Island | Andreas Island | This salvage crate is located on the northern side of Andreas Island, right by the Local Officer. You'll find it in the middle of the camp that is set up here.
Rewards:
| ||
| Salvage ChestKingston | Kingston | Right outside the northern perimeter of the Laurens Prins Plantation is a small waterfall and stream. Behind the waterfall in small alcove you can find this salvage chest. Rewards:
| ||
| Salvage CrateAndreas Island | Andreas Island | This salvage crate is located on the southeast part of Andreas Island. It is found in a small enemy camp that you will visit during the quest "Sugarcane and Its Yields." Take out the enemies in the location right by the water, and snag the crate before anyone notices.
Rewards:
| ||
| Salvage CrateCaribbean Sea | Caribbean Sea | Chest coordinates: 239, 673. This salvage chest can be found on a small unnamed island south of Fort Dry Tortuga. You can gain access to the island from its northeastern side. Once you get to the shore, you'll see two cliffs—one on the left and one on the right. Climb up the broken ladder halfway down the side of the left-hand cliff, and you'll find the chest right on top.
Rewards:
| ||
| Salvage CrateCaribbean Sea | Caribbean Sea | Note: Crate coordinates are 239,671.
Approach the small unnamed island south of Fort Dry Tortuga from its northeastern shore. When you make landfall, look for the two cliffs flanking the beach. Scale the broken ladder on the side of the left-hand cliff. Once you reach the top (be sure to grab the second salvage chest waiting here!), continue up toward the ruins. Walk straight ahead to the giant white flag marked with a red "X" to find this crate sitting directly underneath it. Rewards:
| ||
| Salvage ChestFort Dry Tortuga | Fort Dry Tortuga | After claiming the fort, grab this salvage chest located just outside the War Room! Step out the doors and check the back right corner of the area, right next to a small guard tower. Rewards:
| ||
| Salvage ChestFort Dry Tortuga | Fort Dry Tortuga | To reach this salvage chest, exit the War Room and turn left, crossing to the opposite side of the fort's upper level. Walk up the short steps, and you will find the chest sitting by a stone cage in the corner. Rewards:
| ||
| Salvage CrateFort Dry Tortuga | Fort Dry Tortuga | Located in the southwestern corner near the ground level. Take the short set of stairs behind the building to reach the upper walkway, where the chest sits against the back of the roof. Rewards:
| ||
| Salvage ChestFlorida | Florida | This salvage chest can be found on the northern side of Florida Island, situated right in the middle of a camp. Rewards:
| ||
| Salvage CrateCaribbean Sea | Caribbean Sea | Make your way to the unnamed island west of Andreas Island in Dry Tortuga. From the southeastern dock, follow the main path west until you hit the beach—you'll find the salvage crate waiting for you just below the trail. Rewards:
| ||
| Salvage CrateCaribbean Sea | Caribbean Sea | Head to the unnamed island west of Andreas Island in Dry Tortuga. Starting from the southeastern dock, walk straight ahead and up the hill toward the first house, where you'll find this chest sitting right on the porch. Rewards:
| ||
| Salvage CrateCaribbean Sea | Caribbean Sea | Head to the small island cluster in Dry Tortuga and locate the half-sunken ship on the northeastern side of the southernmost island. From the water, crawl directly into the ship's broken hull and push through to the opposite side. You'll emerge right onto the southwestern beach, where this salvage chest is waiting.
Rewards:
| ||
| Salvage CrateMatanzas | Matanzas | This salvage chest can be found in the restricted area of the Matanzas Plantation, specifically on the lower level of the main manor house. Enter the house through the north door and look immediately to your left to find the chest sitting on a table near a bookcase.
Rewards:
| ||
| Salvage CrateMatanzas | Matanzas | This salvage crate can be found inside the Matanzas Plantation, toward the southwestern corner of the area. It sits underneath a covered shelter right off the main path, right next to the crocodile pond.Rewards:
| ||
| Salvage CrateMatanzas | Matanzas | This salvage crate can be found in the southeastern area of Matanzas Plantation, right next to the warehouse. After dealing with the nearby guards, you can find the crate on the western side of the building, pushed up against the wall. Rewards:
| ||
| Salvage ChestKingston | Kingston | Located on the right (west) side of the southbound road. Guarded by a Redcoat patrol. Rewards:
| ||
| Salvage CrateMatanzas | Matanzas | Make your way to the southeastern section of the Matanzas Plantation's restricted area to find this salvage crate. From the warehouse, head north up the main road until it curves. You'll find the salvage crate sitting right by the campfire, guarded by two enemies. Clear them out to claim it. Rewards:
| ||
| Salvage CrateMatanzas | Matanzas | Make your way to the center of the Matanzas Plantation's restricted area to find this salvage crate. Look for the salvage crate sitting directly underneath the house's attached guard tower, right next to the alarm bell. Rewards:
| ||
| Salvage ChestKingston | Kingston | This salvage chest is located just across the street on the western side from Kingston General Store #4. Look for it inside a small wooden shed attached to the side of the house. Rewards:
| ||
| Salvage ChestKingston | Kingston | Found on top of the guard tower right by the guard. Rewards:
| ||
| Salvage ChestKingston | Kingston | This salvage chest can be found out in the open right by the two pairs of guards sparring and the alarm bell. Rewards:
| ||
| Salvage CrateCaribbean Sea | Caribbean Sea | This salvage crate can be found on the southern side of the unnamed island northeast of Fort Gibara. Crate Coordinates: 676,532. Rewards:
| ||
| Salvage ChestKingston | Kingston | Located underneath a covered stable-like building. Rewards:
| ||
| Salvage CrateKingston | Kingston | Located in a small wooden storage shed on the northwestern side of the restricted area. Rewards:
| ||
| Salvage CrateCaribbean Sea | Caribbean Sea | To locate this salvage crate, set sail for the small, unnamed island situated south of Great Inagua and west of Tortuga. Make landfall and head directly to the southeastern beach to find this crate on shore. Note: Chest Coordinates are 802,360. Rewards:
| ||
| Salvage ChestCaribbean Sea | Caribbean Sea | Located on the small, unnamed island south of Great Inagua and west of Tortuga. Land on the southeastern beach and follow the path north into the cave (accessible only from this side). The chest is resting in a depression in the ground right beside a dead soldado. Chest Coordinates are: 812, 363 Rewards:
| ||
| Salvage ChestKingston | Kingston | This chest can be located right off the main path up stream beneath a waterfall. Chest Coordinates: 629, 178. Rewards:
| ||
| Salvage ChestTortuga Island | Tortuga Island | This salvage chest is located up on the northeastern cliff inside the restricted area of Tortuga Plantation. It sits inside one of the top levels of the large white tower (Tortuga Viewpoint), making it the perfect quick detour while climbing to synchronize the map.
Rewards:
| ||
| Salvage CrateTortuga Island | Tortuga Island | This salvage crate is located within the restricted area of the Tortuga Plantation, up on the northeastern cliff right beside the Tortuga Viewpoint (the large white tower). You will find it next to a hay cart and an Alarm Bell being guarded by a couple of Redcoats, so be sure to take them out first. Rewards:
| ||
| Salvage CrateTortuga Island | Tortuga Island | To reach this salvage chest, navigate the restricted area of the Tortuga Plantation and make your way up to the higher cliff in the northeast. Use the Tortuga Viewpoint (the large white tower) as your landmark; follow the path slightly southeast of the viewpoint to find the chest sitting around a small campsite. Rewards:
| ||
| Salvage CrateTortuga Island | Tortuga Island | This salvage crate is located within the restricted area of the Tortuga Plantation, up the hill on the northwestern side. You'll find it tucked inside a small shack toward the back of the area, just a short distance south of the Mayan Stela. Rewards:
| ||
| Salvage CrateTortuga Island | Tortuga Island | To track down this salvage crate, head up to the northeastern cliff inside the restricted area of the Tortuga Plantation. Make your way to the fields directly in front of the main manor house. You'll find the crate sitting on one of the footpaths near the fields, on the right-hand side as you face the building.
Rewards:
| ||
| Salvage CrateKingston | Kingston | Find this salvage crate on a plantation in northeastern Kingston. Head to the eastern section and look in the far-western corner to find the crate resting against a border wall next to a covered shelter. Rewards:
| ||
| Salvage CrateTortuga Island | Tortuga Island | To track down this salvage chest, carefully navigate through the restricted area of the Tortuga Plantation. Head directly west of the Tortuga Warehouse, and you should spot this salvage chest along one of the footpaths, right beside the nearby alarm bell. Rewards:
| ||
| Salvage ChestKingston | Kingston | Related Activity:This chest can be located right above the western side of the easternmost section of the plantation located in northern Kingston. You'll need a key to open it, so follow the "Crow's Nest" local event instructions to find out more details about the key's whereabouts. How to Reach the Key Face south. You will likely notice a tree in the right corner of the camp with an overturned cart against it—ignore this one. Instead, look toward the left side of the camp to spot another tree next to an empty square cage. Climb on top of the cage, then jump up to the branch above, then climb up once again and head to the end of this branch. Jump to the tree stump ahead, cross it, and leap to the final tree. At the end of this branch, you will find a crow's nest with the key tucked inside. Dive down into the hay cart below, then head beneath the camp's tents to find and unlock the chest. Rewards:
| ||
| Salvage ChestKingston | Kingston | Found inside of the main manor house on the top floor. You will have to enter by either climbing up to a window or to the balcony. Rewards:
| ||
| Salvage ChestTortuga Island | Tortuga Island | To track down this salvage chest, carefully navigate through the restricted area of the Tortuga Plantation. Head directly west of the Tortuga Warehouse to a small house near the back of the property; the chest is tucked against the side, right where the trees and monkeys are gathered. Rewards:
| ||
| Salvage CrateTortuga Island | Tortuga Island | This salvage crate is located within the restricted area of the Tortuga Plantation, just slightly southwest of the Tortuga Warehouse. You will find it resting right up against the side wall of a small building.
Rewards:
| ||
| Salvage ChestKingston | Kingston | Located on the porch of a small house just south and across the street from Kingston North Warehouse. Rewards:
| ||
| Salvage CrateCaribbean Sea | Caribbean Sea | |||
| Salvage ChestCat Island | Cat Island | This chest can be found towards the north-center of this area on Cat Island, near one of the "Sugarcane and Its Yields" quest objectives. Look for a half-wall of storage crates; the chest is located sitting right up against them.
Rewards:
| ||
| Salvage CrateCat Island | Cat Island | This salvage crate is located on the eastern side of this area, right by the Cat Island Viewpoint. Head inside the covered shelter here to find the crate sitting directly against the wall.
Rewards:
| ||
| Salvage CrateCat Island | Cat Island | This salvage crate is located on Cat Island, on the western side of the hostile area. It is situated just north of and right beside the Manor. You will find two guards gathered around a fire among some stacked crates here. The salvage crate is sitting just outside the perimeter of the small fence on the northern side.
Rewards:
| ||
| Salvage ChestSalt Lagoon | Salt Lagoon | This chest is found in the middle of the Salt Lagoon Island. From the viewpoint, head north up the beach past the large rock on your left (near the rowboat). Continue following the path north-northeast to find the chest tucked underneath a large rock overhang.
Rewards:
| ||
| Salvage ChestMariguana Island | Mariguana Island | Found on the northwest side of Mariguana Island. After docking, head toward the shore and follow the path straight. Veer right at the rock overpass and follow the coast to the end. Head into the second rock overpass on your left and check the small nook in the rock on your left for the chest.
Rewards:
| ||
| Salvage CrateCrooked Island | Crooked Island | |||
| Salvage CrateCrooked Island | Crooked Island | This salvage chest is located on the northwestern beach of the Crooked Island village area. You will find it down by the water, sitting right beside the rowboat. Rewards:
| ||
| Salvage ChestCrooked Island | Crooked Island | This salvage chest can be found on the southeastern docks, within the restricted area. Rewards:
| ||
| Salvage CrateCrooked Island | Crooked Island | This salvage crate can be found on the southeastern docks, within the restricted area. Rewards:
| ||
| Salvage CrateCrooked Island | Crooked Island | Head south-southeast from the General Store, following the curve of the boardwalk. Once you spot the northeastern beach on your left and officially enter the Restricted Area, look just ahead to find this blue crate on the path heading toward the beach. Rewards:
| ||
| Salvage CrateCrooked Island | Crooked Island | To track down this blue salvage crate, head south-southeast from the General Store, following the natural curve of the boardwalk. Once the campfire (near Secret #1) comes into sight down below on your left, look for this blue crate sitting just off the left side of the walkway. Rewards:
| ||
| Salvage CrateCrooked Island | Crooked Island | Located within a restricted area on the southeastern side of the village. Check directly underneath one of the main village boardwalks to find this chest. Rewards:
| ||
| Salvage ChestCrooked Island | Crooked Island | To find this salvage chest look for the building located immediately to the east of the Tavern. You will find this salvage crate sitting right behind it. Rewards:
| ||
| Salvage CrateCrooked Island | Crooked Island | Located at the southernmost point of Crooked Island. You will practically run face-first into this salvage crate sitting right on the docks the second you step off your ship. Rewards:
| ||
| Salvage ChestCaracol | Caracol | Dive from the ocean side of the Caracol Viewpoint and surface. Look straight ahead toward the land to find this chest sitting in a small indent at the very bottom of the cliff face. Chest Coordinates are: 921,338. Rewards:
| ||
| Salvage CrateCaracol | Caracol | This salvage crate can be found on the northern beach in Caracol, but to reach it you'll have to take a path through the southern forest. Salvage Crate Coordinates are: 915,341. Head behind Dinah's house (a character from the "A Second Chance" officer quest), through the tomato patch, and take the right-hand path to the cliff. Climb the overhanging tree branch (where the Animus Keys are located), dive into the water below, and look for this crate on the rocks beside the wrecked ship. Rewards:
| ||
| Salvage ChestGreat Inagua | Great Inagua | Found in western Great Inagua. Head north down the main path, round the corner, and look up to your left to spot the chest on a platform. Climb the ladder to the tree platform on your right, then jump across to collect the chest. Chest coordinates: 809, 437. Rewards:
| ||
| Salvage ChestGreat Inagua | Great Inagua | Found in northwestern Great Inagua during the "A Single Madman" quest. Heading toward Julien du Casse's mansion, pass through the rock overhang into the enemy camp and clear out the three guards. Face away from the entrance archway and look right to spot a hidden path behind some overhanging vines. The chest is sitting at the end of this concealed path.
Chest coordinates: 816, 436.
Rewards:
| ||
| Salvage ChestAmbergris Key | Ambergris Key | Head to the inner ruins in the middle of the area and look for it resting against one of the columns, with its back facing east, and close to the southern exit with stairs leading out. Rewards:
| ||
| Salvage ChestGreat Inagua | Great Inagua | Standing on the far western docks along the beach near the Great Inagua Manor, look up to spot a cave in the cliffs to the west. To reach it, head back to the beach and up into the grass on the western side to face the cliffside. Head up the hill to find a climbable tree. Traverse from tree to tree to cross over to the target cliffside, and climb to the very top to find the chest.
Chest coordinates: 813, 446.
Rewards:
| ||
| Salvage ChestCaribbean Sea | Caribbean Sea | Found on a small, unnamed island with a pirate camp in the Gibara region. Locate the wrecked boat holding the Animus Fragment, then look to the land immediately on your right to find the chest sitting against a rock wall.
Note: Chest coordinates are 824,569.
Rewards:
| ||
| Salvage CrateCaribbean Sea | Caribbean Sea | Found on a small, unnamed island in the Gibara region. From the wrecked boat, look north to locate a pirate camp. Clear out the enemies to safely loot the salvage crate in the center of the camp.
Note: Chest coordinates are 824,571.
Rewards:
| ||
| Salvage ChestFort Conttoyor | Fort Conttoyor | Found under a small covered shelter on one of the lower levels of the fort in the southern section. Rewards:
| ||
| Salvage ChestFort Conttoyor | Fort Conttoyor | Found on one of the upper levels of the fort, near the center. Rewards:
| ||
| Salvage ChestFort Conttoyor | Fort Conttoyor | Up on a taller tower towards the middle of the fort. Rewards:
| ||
| Salvage CrateCaribbean Sea | Caribbean Sea | Accessed via the northeastern path into the camp. Clear the small outpost at the top of the hill, then head downhill through the bushes to eliminate the remaining guards. The salvage chest is sitting just up ahead, to the left of the fire. Rewards:
| ||
| Salvage CrateCaribbean Sea | Caribbean Sea | Accessed via the northeastern infiltration point. Once you climb to the top, you will immediately face two guards, a tent, a salvage crate, and a salvage chest. Loot the crate first, then wait for the coast to clear to grab the chest against the wall on the other side of the tent. Chest Coordinates: 139, 479. Rewards:
| ||
| Salvage CrateCaribbean Sea | Caribbean Sea | If you took the northeastern infiltration point to sneak into the camp, as soon as you climb all the way up, you'll be facing 2 guards, a tent, and a big blue salvage crate right in front of you! Chest Coordinates: 139, 480. Rewards:
| ||
| Salvage CrateArroyos | Arroyos | |||
| Salvage CrateArroyos | Arroyos | |||
| Salvage CrateArroyos | Arroyos | This salvage crate can be found on the boardwalk right behind the Arroyos General Store. It will be on the eastern part of the area, just south of the viewpoint. Rewards:
| ||
| Salvage CrateArroyos | Arroyos | Located in the southeastern corner of the village, just a short distance from the Local Officer. Found on the backside of a dockside home, resting on the back boardwalk overlooking the water along the perimeter. Rewards:
| ||
| Salvage CrateArroyos | Arroyos | |||
| Salvage ChestFort Castillo de Jagua | Fort Castillo de Jagua | Found on the level below the War Room Door, on the far western side of the walkway against the wall. Rewards:
| ||
| Salvage ChestFort Castillo de Jagua | Fort Castillo de Jagua | Head through the dock entrance and turn right onto the next level. Walk straight toward the ramp on the left, and check the dark corner just to its right to find this chest. Rewards:
| ||
| Salvage ChestFort Castillo de Jagua | Fort Castillo de Jagua | Located on the northeastern side of the fort, inside one of the now-broken defense walls. Rewards:
| ||
| Salvage ChestBlack Island | Black Island | Found on the northern side of Black Island, tucked along the outer edge of a small beach camp. Two guards watch over this area—if you observe them for a second, they’ll start fighting each other, leaving the chest wide open for the taking.
Rewards:
| ||
| Salvage CrateBlack Island | Black Island | Found on the northwestern side of Black Island, right off one of the trails leading toward the warehouse. Look for two guards on a small wooden boardwalk guarding bags and crates of produce. The salvage crate will be right next to the guards and a ton of bananas! Rewards:
| ||
| Salvage ChestBlack Island | Black Island | Head to the south side of Black Island and look for the main house. You'll find this salvage crate tucked underneath a pergola on the western side of the building—just keep a close eye out for the guards on patrol.
Rewards:
| ||
| Salvage CrateCaribbean Sea | Caribbean Sea | Head to the small, unnamed island just east of Andreas Island. Make your way to the southeastern part of the area, where you'll find this salvage crate resting beside an abandoned house, right underneath its attached covered shelter.
Rewards:
| ||
| Salvage CrateCaribbean Sea | Caribbean Sea | Crate Coordinates: 380, 479. Rewards:
| ||
| Salvage CrateCaribbean Sea | Caribbean Sea | Crate Coordinates: 380, 479. Rewards:
| ||
| Salvage CrateCaribbean Sea | Caribbean Sea | Crate Coordinates: 380, 481. Rewards:
| ||
| Salvage CrateCaribbean Sea | Caribbean Sea | Located within the restricted area of the small Spanish camp on the unnamed island. Look for this salvage crate on the southeastern beach, resting right beside the tents. Crate Coordinates: 264, 383. Rewards:
| ||
| Salvage CrateCaribbean Sea | Caribbean Sea | Located within the restricted area of the small Spanish camp on the unnamed island. Look for this salvage crate on the northern side of the island, under a covered tent near some workers. Crate Coordinates: 263, 385. Rewards:
| ||
| Salvage ChestCaribbean Sea | Caribbean Sea | Located within the restricted area of the small Spanish camp on the unnamed island, south of Pinos Isle. Look for this salvage chest on top of the roof of the small fort near the Animus Keys. Chest Coordinates: 261, 385. Rewards:
| ||
| Salvage CrateCaribbean Sea | Caribbean Sea | Located on the small, unnamed island slightly southeast of Tulum. From the northwestern beach, climb the eastern side of the ancient Maya ruins. About halfway up, take the stone walkway that deviates to your right and pass through the open stone doorway. Be sure to snatch the bonus chest waiting just around the corner overlooking the ocean! Climb higher up the ruins, then vault through the final open doorway towards the top to find the chest sitting in front of you. Chest Coordinates: 113, 376 Rewards:
|

© MapMaster.io 2024. All rights reserved.